
I wonder how many other cooks are stirring up good smells in their kitchen this morning in preparation for tomorrow?
This is the first year we have held a Thanksgiving meal at our house. Last year we were in North Carolina for Thanksgiving. A couple of my brothers have plans with their wives' family but usually my parents invite whoever does not have plans, to share Thanksgiving at their house. Since I have eight siblings, even if a few are missing, there is still enough for a table full.
This year Ed and I decided to host the meal here. My mom and sisters are bringing all the cold food which only leaves me with the hot food. With my energy level these days, I knew I could not hold a kitchen marathon. But with a little planning, I thought it would be very doable.
The first decision I made was to NOT look for any new recipes. I love to try new things, but that takes time - and then brings stress while wondering if the new recipe will turn out. There is a reason some of my mom's recipes are classics. I would stick with the recipes I have made dozens of times before.
On Monday I cleaned out my fridge. My goal was to make one recipe each day. Monday it was stuffing, Tuesday I made the mashed potatoes, and today I'll put together the green bean casserole. They will await in the fridge.
I began thawing the turkey on Monday. Tonight (Wednesday) I'll rub the turkey with a curry rub and begin the slow roasting overnight. I'll pull the turkey out of the oven about an hour before we eat to give time for the stuffing and green beans in the oven. The mashed potatoes will heat in the crock-pot. The only tasks for Thanksgiving Day will be to set the table, carve the turkey, and make the gravy.
If others were not bringing the dessert, I would have chosen something like pumpkin roll that I could have made and frozen last week. Or at least frozen the pie crusts ahead of time.
You probably already have your recipes planned, but if you want to check out mine, here is some links to my mom's classic Thanksgiving recipes.
Easy Roast Turkey
Curry Turkey Rub
Stuffing
Green Bean Supreme
Sweet Potato Casserole
Pumpkin Pie
And here is the make-ahead mashed potatoes that I made yesterday.
Refrigerator Mashed Potatoes
5 lb potatoes, peeled and cubed
8 oz. cream cheese
1 cup sour cream
1 tsp salt
1/4 tsp pepper
garlic powder and onion powder if desired
Cook potatoes until tender. Drain, mash, and add warm milk until smooth. Add remaining ingredients and combine well. Cool and cover. Refrigerate and use within two weeks. Or seal tightly and freeze. To reheat, bake for 30-45 minutes at 350 degrees or in crock-pot for several hours.
I'd love to hear what you plan for Thanksgiving - especially how you reduce the last minute stress!
Wednesday, November 27, 2013
Tuesday, November 19, 2013
(Ugly) Pumpkin Chocolate Chip Cookies
My dad always said that ugly cookies tasted the best.
And these pumpkin cookies may fit that category. They certainly can't be described as cute - but then, maybe looks are not everything.
My sister gave me this recipe for soft moist pumpkin cookies and my children (and me) are loving them. This makes a large batch - great to stock the freezer. We actually think they taste best straight out of the freezer.

The (Ugly) Pumpkin Chocolate Chip Cookie
3 cups mashed pumpkin
3 cups sugar
1 1/2 cup oil
3 eggs
6 cups flour (I used half whole wheat.)
2 T baking powder
2 T cinnamon
1 1/2 tsp salt
1 T. baking soda
3 tsp vanilla
3-4 cups semi-sweet chocolate chips
2 cups chopped walnuts (optional)
Combine pumpkin, sugar, oil, and egg well. Mix in all other ingredients. Bake at 350 degrees for 9 minutes.
Friday, November 15, 2013
How to Sew a Cape Dress - Sewing the Dress Together
I always consider cutting out the dress pieces as the worse part. After it is cut out, all the decision making of what size, style is done. To me, the sewing is the fun part as the dress emerges from a pile of fabric.

First I sew up the darts (if using) in the bodice and cape.

Then I sew the bodice front and back together at the shoulder seams and do the same with the cape front and back. I like to hem the sides of the cape at this point.

Next I sew the bodice and the cape together at the neckline. I don't use any facings, which makes assembling so much easier. But sewing the cape and bodice together does take some different thinking. Typically when sewing, the fabric pieces are put together with the right sides of the fabric together so that when the seam is turned, all the seams will be inside.

But when sewing a bodice and cape together, place the right side of the cape against the wrong side of the bodice. When the seam is turned, the raw edge will be between the bodice and cape and will be hidden in the neckline.

Next I trim and clip the seam allowance at the neckline to allow it to turn smoothly, and stitch the seam allowance down against the bodice. This makes a smooth neckline with no visible stitching on the cape.


Using a basting stitch, I baste the cape to the bodice at the waistline and in the back where the zipper will be inserted.

Sometimes I have had trouble with my cape gaping. I have found that if I pull the corner of the cape just slightly into the waistline, it helps with the gaps.

Next I finish the sleeves, stitching up the arm seam and finishing the cuffs however I chose for this dress. You can wait until the sleeves are sewn into the dress to finish them but I find it much easier to work with the sleeve before it is attached to the dress. On this dress, I made a simple pleated cuff.
Next I stitch the side seams of the bodice and insert the sleeves. I like to stitch my sleeves with double seams (just stitching twice around the arm hole) since sleeves tend to be a stress point that I have to mend often if not reinforced.

It is beginning to look like a dress! Almost done!
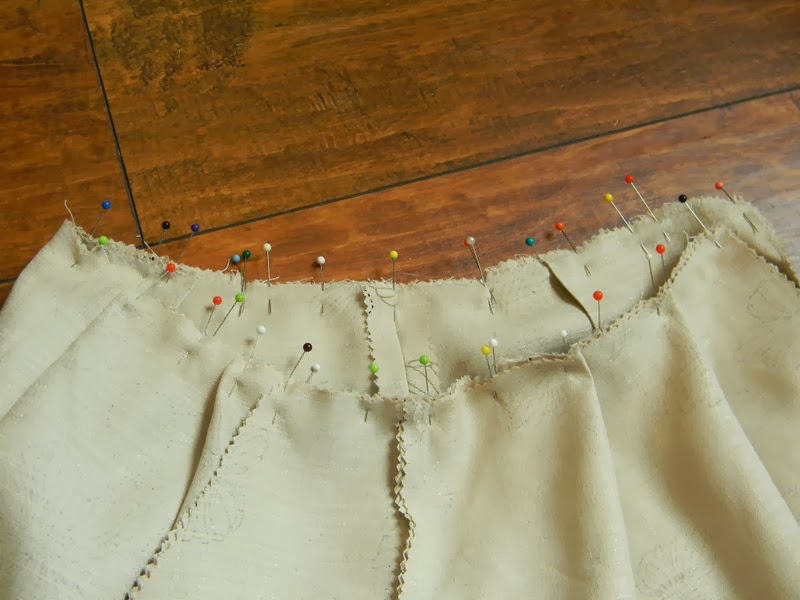
Next I sew the side seams of the skirt, inserting pockets if desired. Prepare the skirt to be attached to the bodice, with pleats, gathers, or however.

For this skirt, since I wasn't using a skirt pattern, I pinned the skirt to the bodice at the side seam and center back and front. Then I measured even pleats in the front and back to pull in the fullness of the fabric.

After I was satisfied with the way the pleats looked, I stitched the skirt to the bodice. This is another spot I like to double stitch to avoid mending it later.

Next I insert the zipper. I like to use invisible zippers because then if my stitches are wocky, no one can see it.
Hem the skirt and it is all done!

And the final result.
Just in case you are curious...this photo was taken months ago. Right now I could never zip up this dress.

This is what I'm looking like today at 32 weeks!
How To Sew a Cape Dress
Part One - Finding a Pattern
Part Two - Cutting Out the Dress

First I sew up the darts (if using) in the bodice and cape.

Then I sew the bodice front and back together at the shoulder seams and do the same with the cape front and back. I like to hem the sides of the cape at this point.

Next I sew the bodice and the cape together at the neckline. I don't use any facings, which makes assembling so much easier. But sewing the cape and bodice together does take some different thinking. Typically when sewing, the fabric pieces are put together with the right sides of the fabric together so that when the seam is turned, all the seams will be inside.

But when sewing a bodice and cape together, place the right side of the cape against the wrong side of the bodice. When the seam is turned, the raw edge will be between the bodice and cape and will be hidden in the neckline.

Next I trim and clip the seam allowance at the neckline to allow it to turn smoothly, and stitch the seam allowance down against the bodice. This makes a smooth neckline with no visible stitching on the cape.


Using a basting stitch, I baste the cape to the bodice at the waistline and in the back where the zipper will be inserted.

Sometimes I have had trouble with my cape gaping. I have found that if I pull the corner of the cape just slightly into the waistline, it helps with the gaps.

Next I finish the sleeves, stitching up the arm seam and finishing the cuffs however I chose for this dress. You can wait until the sleeves are sewn into the dress to finish them but I find it much easier to work with the sleeve before it is attached to the dress. On this dress, I made a simple pleated cuff.
Next I stitch the side seams of the bodice and insert the sleeves. I like to stitch my sleeves with double seams (just stitching twice around the arm hole) since sleeves tend to be a stress point that I have to mend often if not reinforced.

It is beginning to look like a dress! Almost done!
Next I sew the side seams of the skirt, inserting pockets if desired. Prepare the skirt to be attached to the bodice, with pleats, gathers, or however.

For this skirt, since I wasn't using a skirt pattern, I pinned the skirt to the bodice at the side seam and center back and front. Then I measured even pleats in the front and back to pull in the fullness of the fabric.
After I was satisfied with the way the pleats looked, I stitched the skirt to the bodice. This is another spot I like to double stitch to avoid mending it later.

Next I insert the zipper. I like to use invisible zippers because then if my stitches are wocky, no one can see it.
Hem the skirt and it is all done!

And the final result.
Just in case you are curious...this photo was taken months ago. Right now I could never zip up this dress.

This is what I'm looking like today at 32 weeks!
How To Sew a Cape Dress
Part One - Finding a Pattern
Part Two - Cutting Out the Dress
Tuesday, November 12, 2013
How to Sew a Cape Dress - Cutting out the Dress
I'm one of those talk-with-their-hands people. I'm not sure how to describe a project with only words and few photos. But I'll dive in and hope you ask questions for anything that is not clear.
Yesterday I shared that my pattern started with a purchased pattern that I tweaked and adjusted for me. I strongly encourage you to try out your pattern with scrap fabric before using your good fabric. You probably won't need to make a whole dress - just the bodice. The frustration of completing a dress then finding it does not fit is a frustration to be avoided at all costs!
To make a cape dress, you will need a pattern for the front and back bodice, a front and back cape, a sleeve, front and back skirt, and pocket, if you wish.

Bodice and Cape
This is my bodice pattern. I like to use wrapping paper to make patterns. It is easy for me to see which patterns go together if I cut one pattern from Christmas paper and another from blue checks. As I adjust a pattern, build up the neckline, add to a side seam, or whatever - a pattern can have so many notes and additions that eventually I trace off a new pattern. I like to date the pattern so I know which version is the latest.

For my cape pattern, I use my bodice pattern. I fold in the sides making an almost straight line from the shoulder to the waist and use this for cutting out the cape.
To cut out the bodice, both the front bodice and the front cape pattern is placed on the center fold of the fabric so that when it is unfolded, it is one piece.
The back bodice and back cape pattern is not placed on the fold since it will have a zipper up the back.
Sleeve
You can use about any sleeve pattern you like as long as the sleeve hole in the bodice and the sleeve top are the same dimensions. A gathered or pleated sleeve is easier to adapt to various dresses. A fitted sleeve has to fit more perfectly.
Skirt
Various skirts patterns can also be used with your bodice. Again, a gathered or pleated skirt will be easier to adjust to various bodice patterns. A fitted skirt will have to be carefully measured to find if it fits your bodice. If you measure your bodice pattern at the waistline, subtract the seam allowances and darts, you will know how wide your fitted skirt pattern will need to be.

I often do not use a skirt pattern. For this dress, I cut out a rectangle of fabric, making sure the front skirt was on the fold of the fabric. Since I planned to make a pleated skirt, the top waistline of the skirt I cut one and a half times as wide as my bodice. In other words, if one of my bodice pieces (a quarter of the dress) was ten inches wide, I cut the top of the skirt fifteen inches wide. I cut the bottom a couple inches wider, maybe about 18 inches in this example, and then made the side seam diagonal from the top to the bottom for however long I wanted my skirt.
And I'm sure that description is as clear as mud. Sorry for my limitation with words. Maybe I need to shoot a video!
Next we will look at sewing the dress.
Monday, November 11, 2013
How to Sew a Cape Dress - Finding a Pattern
I love reader's questions. But one question that I get frequently, I never feel that I adequately answer. I finally decided I'd have to do a series of posts in attempt to answer it.
I'm often asked by readers where to find a pattern for my dresses. Or how to make a dress like mine.
There is just no simple answer. I wear what is known as a cape dress. It has an extra piece of fabric (or a cape) over the bodice of the dress. It isn't a pattern that you can find at your local sewing store.
The pattern I use is from several patterns that I have purchased, adapted to a cape dress, adjusted, tweaked, and finally, after over a decade, feel that it fits exactly how I want. I could copy off the pattern and share it with you - but it is doubtful that it would fit you.
Probably the best way to sew a cape dress is to find someone close to your size, and ask for their pattern. Several of you I've been able to direct to a local Mennonite church and a seamstress who could help you. But some of you live hundreds, even thousands of miles from any Mennonite community.
And maybe I should insert here that I am not saying that everyone should wear a cape dress. I believe that according to the Scripture, a woman should dress modestly. You can read more of what I've written on the topic of modesty here. But there are different styles of dress that fulfill the Biblical command of modesty. Many Mennonite churches, including my own has chosen to wear the cape dress and I have learned to appreciate the simplicity of this style of dress, but I'm not at all saying that this is the only way for a Christian woman to dress in a way that honors God. Neither is the cape dress something that you can only wear if you are Mennonite. I have friends who have chosen to wear a cape dress just because they like the style of dress.
So this series is not to condemn the way others dress. I hope this is helpful for those many readers who have written and asked for information on sewing a cape dress.
This series is also not a complete guide to sewing a dress. I'm not sure that I can describe something like sewing with a keyboard. I wish you could just come and spend a day by my sewing machine. I will assume that if you tackle this project you have basic sewing skills. You know how to sew a dart, pleat, and zipper. If you are not to that point in your sewing skills, spend some time with some simpler projects first.
To begin look for a dress pattern at my local fabric store that could be adapted into a cape dress. My goal is to find a dress pattern with sleeves that has a natural waistline with darts for fitting ease. If the neckline is too low, it can be adjusted. If you don't like the sleeve or skirt that the pattern shows, this too can be changed. But a basic bodice pattern is what you are looking for.
The patterns I used for my dress pattern are long out of print so I scanned the patterns of some popular pattern companies to see what is available now. I found two that I think would work.
http://www.simplicity.com/p-8072-misses-dress.aspx
http://www.simplicity.com/p-9785-burda-style-dress.aspx
From appearance, both of these two patterns would probably work to begin your pattern making. But I haven't used either of these patterns so don't know for sure and you may find something better.
Another resource I want to mention is Preparing a Cape Dress Pattern from CLP. There is some very good information here, much more than I will share, on adjusting a pattern and sewing a sloper. CLP also has a second booklet on Sewing a Cape Dress which also goes into much more detail than I will. These two booklets are a little dated but still contain a lot of good information.
EDIT on 2/10/2020:
Sew Basic Patterns now has a cape dress for women of all sizes. Excellent patterns that take the guessing out of cape dress making.
After you have a basic pattern, what next? The next post will be on cutting out a cape dress.
Friday, November 1, 2013
Preserving Food and Sanity - Part Three

I'm not sure I have much more to share since Stephanie and Regina did so well in sharing their thoughts. (But if you know me well, you know that I always have something more to talk about.)
If you haven't read the first two installments, read the question that sparked the topic and first answer here and the second answer here.
1. If you have never preserved food, give yourself time to learn this new skill. It is far better to start small, maybe with one kind of vegetable than to attempt to grow all you own food and get discouraged. I wrote about this topic in garden planning. Make small, attainable goals, learn from your mistakes and successes, and use your experience to have a better garden the next year. Eventually you will be the expert that others turn to for advice.
2. Borrow others' experience. Regina touched on this but I wanted to mention again that as useful as books and magazines are, an experienced friend is your best asset in growing and preserving food. If you know few people who garden, you might need to get creative in finding that experience. But if you ask questions, take notes, and listen, you may find help at a local greenhouse, your extension office, or the elderly man who sits behind you at church.
3. Keep good records. I'm often asked how much to plant or preserve, but I find that question impossible to answer. How fertile is your soil? What pest problems do you have? How much of this vegetable will your family eat in a year? The variations are limitless. I'm not even sure how much I should plant some years - and can certainly not give any other person good advice.
But your records will be invaluable. I have a ruled notebook that I write down all my preserving records. In the back, I have written down canning and freezing information. For years, I had to call my mom many times each summer because I couldn't remember how long to can peaches (only one example). I finally decided to save myself all those phone calls and write it down!
I also have a 3-ring binder that I have all sorts of gardening info. I save my packing list from the seed company so I remember what seeds I ordered. I sketch my garden plan so I remember what I planted where and can rotate the vegetables the next year. I also like to write down a few notes about when I planted the garden, what the weather was like, and any particular problems. Some years I have included harvest dates, or dates when I bought fruit from a local orchard.
On my most organized years, I utilized my calendar. I knew I wouldn't pull out my binder every time I planted another row of beans, or we picked the first strawberry. I kept a green pen by my calendar and wrote garden notes right on the calendar. At the end of the year, it was easy to flip through the calendar looking for green ink to record the garden info in the garden notebook.
After a few years, you will have your own resource of information and will know if you need to plant more bean seeds or fewer, plant earlier or later, and how much to put in your freezer or can in jars.
4. My house doesn't have priority at canning season. I have a few goals to keep my head above water but otherwise, I try to remember that for this season, I can't be particular about my house. My goals (which are not always met) are to wash up all the dishes before I go to bed, clean the bathrooms every week, and have one of the children vacuum the dining room every day. If these three things are done (plus some laundry) and the children do general pick up of their toys, I can ignore the other dust and dirt for a while.
5. I don't even attempt to homeschool during the busiest gardening season. Several years ago, I learned that trying to start school the last week of August when my garden was in peak season was a recipe for a crazy mom. I decided that I would do anything to avoid starting school during peak harvest season.
For us, the answer has been to homeschool in July. We usually finish our school year in mid-May. After a six week break, the children need something to keep them occupied, especially since July is often our hottest weather. July is also in between the planting and harvesting. I may have green beans in July, but little else. For the last two years, we have planned to have four weeks of school in July. We then take a six week break until mid-September. This gives us a three-month summer vacation, but divided in the busiest garden season. An added advantage has been that the children have a refresher course mid-summer and do not forget as much.
This is what works for us- you find what works for you! I know some moms who homeschool for three days a week in summer so they have a day or two to work on bigger projects like harvesting.
6. Even those of us who have grown up helping our mom's garden, still have to make choices for our sanity. I have decided not to grow peas. We love peas, but with the garden space they take and the time, I choose to go to a local pick-my-own patch. They also have a shelling machine so I can pick and shell my peas in a few hours and be done for the year. Regina chooses to buy her peas and limas at a produce farm. They cost more, but her husband thinks it is good use of money to save her the time of picking. And Stephanie buys cases of petite peas already packaged and freezes them.
In an ideal world, maybe we would grow and preserve all our own food, but well, I can't do it all. I have not grown lima beans for years, though they are my husband's favorite vegetable. Limas seem to be ready to harvest during the busiest harvest time, so he tells me not to plant them. I haven't made pickles for at least five years. We don't eat that many pickles, so I just buy a jar occasionally. (I was given some cucumbers by a friend last year and made some pickle relish.) I find that as my family grows, I have to put away more of the basics, so some of the "extras" that I did as a new bride, are set aside.
What does your family like to eat? How much time can you give to a garden? What is most important to you? Do you want fresh salads, or frozen green beans? Do you want home canned fruit, or tomato sauce? Can you do it all? Maybe. But, especially if gardening is new for you, I wouldn't recommend it!
Is there any more questions I missed? Do you have some good hints on preserving food without going crazy? I'd love to hear your hints because I know there is much more I can learn!
Subscribe to:
Posts
(
Atom
)
LinkWithin


