Wednesday, June 30, 2010

Gina's Favorite Perennials - Part 1

Every since writing about perennials, I've wanted to share some of my favorite perennial flowers, but I didn't know where to begin. Should I separate the shade lovers from the sun lovers? Should the summer bloomers be with the fall bloomers? I finally decided to pull out a few pictures, in complete randomness, and just share them, and stop stressing over it!

But first, my criteria for a favorite perennial.

I do not have time to coddle a plant. I have enough little persons that I have to keep fed and clothed, if a plant can't survive (and thrive) on neglect, it doesn't deserve a spot in my flower bed. I look for plants that are long blooming (all summer is far better then one week) hardy (in my zone 6) and easy care (no staking or spraying). Extra points are given to plants that are fragrant or are good cut flowers.

Before I was married I worked at a greenhouse and tried growing lots of different perennials. I still buy a couple new perennials every year just to try them out. Some are winners and join the ranks of favorites. Others fail for numerous reasons and don't deserve a place in the flower bed. Obviously, this is a hobby to me and something I think worth spending time (and a little money).

Many plants come in numerous varieties. If I have a favorite variety I will label it in quotation marks.

  •  Shasta Daisy "Becky"  
After trying many different daisies. This one is my favorite. It blooms for weeks in the summer. It never flops over or needs staking. And it is a great cut flower. It spreads well and I've given starts to many many friends over the years.

  •  Helopsis varigated
 There are numerous helopsis varieties but I like this one because of the interest that it's variegated foliage adds. Another long blooming flower that can be cut for bouquets.
  • Daylily 
 There is far too many good daylily varieties to describe here. Not a cut flower but a great addition to the summer flower bed.

  • Geranium cranesbill "Rozanne"
 This is not the typical annual red geranium that most are familiar with. The cranesbill geraniums are a hardy perennial with totally different growth habit. Lots of good varieties but "Rozanne" is my favorite of the ones I've grown because of it's color and long bloom time.
  • Echinacea "Magnus" purple coneflower
In recent years, many new coneflower varieties have been developed. I find that the newer ones are not quite as hardy for me as the old standard "Magnus".

To be continued...

In meantime, what is your favorite perennial?

Tuesday, June 29, 2010

Fruit Crisp Topping for Freezer

One of our favorite summer desserts are fruit cobblers and crisps. I found that I can make a fruit cobbler quickly by using the master muffin mix and spreading over fruit.

I recently found a fruit crisp topping mix that could be prepared ahead and frozen. I love ideas like this that can be prepared ahead of time for a quick dessert or unexpected guests. The original recipe comes from Life as Mom but she didn't include directions of how to actual use it specifically, so I'll share how I did it.

Fruit Crisp Topping for Freezer

2 3/4 cup flour (I used whole wheat.)
1 cup quick oats
1 cup rolled oats
1 cup brown sugar
1 cup white sugar
1 1/2 cup soft butter

Mix all together. Fill pint containers and freeze. Makes about 5 pints.
 To use, place 1 quart of fruit in 9x13 pan. I used 2 cup canned peaches and 2 cups fresh blueberries here.
Sprinkle 1 pint of topping over fruit.
Bake at 350 until hot and bubbly. I baked for 20 minutes.
Serve with vanilla ice cream or milk!

I'll be trying this recipe with other fruits. I'm not sure if when using a "drier" fruit like apples, if more liquid will be needed. If you give this a try, let me know what works for you.

Saturday, June 26, 2010

Test Plots

Small-Scale Grain Raising, Second Edition: An Organic Guide to Growing, Processing, and Using Nutritious Whole Grains, for Home Gardeners and Local Farmers
Last year Ed read Small-Scale Grain Raising by Gene Logsdon from the library. He had been interested in growing some grain before but this book gave some tools to make the idea less of a dream and more reality! Last summer Ed converted part of our pasture into four test plots. The idea is to experiment with grain raising and any other ideas that we come up with that we just can't fit into our garden.

I recently realized that I've never posted any pictures of these little plots. Of course, we don't know what we are doing or if it will work. But I like to read about other gardener's goals, plans, and ideas - whether they work or not!

Last fall, we planted some buck wheat to help clear the weeds and thistles.

This spring, we found that some of the things we wanted to plant (like wheat) needed to wait until fall. So most of these plots are actually extending our garden then growing grain!
The first plot has Rainbow Inca corn. We had planted a little of this last year, dried the corn, roasted, and ground it into wonderful cornmeal. This plot was planted with seed saved from last year. Hope it didn't cross pollinate and come up something strange!

The second plot is planted with naked oats. These are oats that are hulless. They are supposed to be the homesteader's dream. The oats did not come up well but they have filled in and shaded out the weeds well.
It is a beautiful patch but we still have a lot to work out. How to harvest? (Ed bought a scythe at a yard sale.) How to roll the oats into useable oatmeal without buying an expensive machine? Let me know if you have any hints for us!
This patch is our Three Sisters Garden. Three Sisters is what the Indians called their garden method of planting corn, beans, and squash together. The corn and beans are planted in hills with squash between the hills.

The three crops are to benefit each other. The corn supplying a trellis for the beans, the beans giving nitrogen to the corn and the squash shading out the weeds.

We've had critter problems in this patch. It is too far away from the house for me to keep the rabbits chased out. I've planted the beans and corn three times, so some plants are large and other hills are just beginning. Most of the beans have disappeared. I'll probably have horrible germination. But I mainly did this patch just for fun with the children. Hopefully we'll at least get a few pumpkins.
The fourth patch is things that I never plant because I run out of garden space- lima beans (a favorite for the rabbits) sunflowers, and popcorn.

In the fall, we hope to plant rye and wheat. I'll try to remember to keep you posted. And if you have any hints on grain raising - please help us out!

Linked to Garden Party.

Friday, June 25, 2010

Frugal Gardening Tip #5 - Saving Water


A few of you have been deluged with rain recently. But, right now, we are dry. Yesterday I noticed all the corn rolled up tight. They looked like a field of spiky cactus instead of the lush green waves of corn that we had last week. The children complain that the grass in "crunchy" and hurts their bare feet.

I know I am blessed to live in an area that generally receives adequate rainfall. We have a summer drought every so often, and a few local farmers irrigate if they are located by a creek. But unlike other parts of the country or world, crops typically grow well here without too much additional watering. Our garden soil is limestone with a good mix of clay, plus the garden is located in a low spot, so we rarely need to water our garden unless a dry spell is extended for a lengthy period (which is what we are in right now.)

It isn't fun to watch your garden and flower beds shrivel up when a dry spell hits. Even though our livelihood does not depend on our garden, I sure would miss it if we didn't receive a harvest.

Wisely using water is something be a goal for us all. We have a good well but those of you who purchase water or have your water use restricted or rationed could probably teach me a few things about wise water usesage.

Here is few tips that we've learned.

  • Build up your soil. Soil absorbs and drains water at different rates. Our clay type ground hold water well. Sandy soil will drain water faster. But all soils improve with added compost. The decomposed leaves, grass, and manure will hold moisture like a sponge and slowly release it to the plants. Good soil will grow stronger plants which will be better able to withstand drought.

  • Mulch. I've already talked about how we love mulch. Last week when my husband tilled up our pea patch. The ground looked striped. Where the peas were growing the ground was dry. Between the rows where we had mulched with grass clippings, the ground was damp. Unless a dry spell is extended, mulching eliminates our need to water.

  • Plant in the ground. I love raised beds, hanging baskets, and container gardens of all types. There certainly is a place for all three, but planting in any kind of raised container or bed instead of directly in the ground is going to drain out the water faster and dry out the ground more quickly. If you live in a bog, this may be of benefit. Of course, if your garden options are limited to pots on your deck, you'll just have to plan on watering. Personally, I have been limiting my container gardening. When we first married, I planted many containers. There were pots on the front and back deck, beside the garage, and in the herb garden. The pots looked great. But, especially as my family responsibilities have increased, my containers became more and more neglected. By the end of summer, the pots were all dead. I've learned to hold back my enthusiasm and only plant as many pots as I can reasonably water through the dog days of August and plant the rest of the plants in the ground where they will survive better with neglect.

  • Bump up a size. If you do plant containers or hanging baskets, the larger the better. A little 8 inch hanging basket will dry out significantly faster then a larger 10 inch basket. Since 8 inch hanging baskets are cheaper, buy the smaller pots and switch them to your own larger pots. The extra soil will give the plants a reservoir of water during dry times.

  • Plastic is better. I can't believe I just said anything good about plastic, but personally I've found that plastic is better at holding in moisture. Clay pots "breathe" which can be good for roots unless it is dry. Most roots don't like "dry". I love the metal hanging baskets with fiber liners, but they are notorious for dehydrating plants. Unless you have nothing better to do then water your hanging baskets twice a day, choose plastic. Or if you like the look of the metal/fiber baskets. Line the inside with a heavy plastic bag before filling with soil and plants.

  • "Diaper" your hanging basket. One of my friends places a disposable diaper on the bottom of her hanging baskets. If you've ever accidentally laundered a disposable diaper (I have, more then once!) you know that the gell stuff they contain blows up to huge proportions when immersed in water. Let that work in your favor to provide water for your plants.

  •  Choose plants wisely. This may be difficult with vegetables, (any variety of sweet corn is going to take water) but it really pays in the flower bed. And in a true drought, my extra water is going to be focused on the vegetables and not the flowers! Generally, perennials take less watering then annuals. Perennials have had time to build large root systems and won't shrivel and die at the first heat wave. Even among perennials and annuals some choices have a much better drought tolerance then others. When shopping at your garden center, one clue on drought tolerance will be found on the plant tag. Plants that like full all day sun, are usually better then plants that prefer only part sun or shade. 

  • Soak don't sprinkle. When you do choose to water, a soaker hose is great investment. A soaker hose looks like a regular hose but it contains lots of tiny holes. You stretch the hose down your garden bed and the water is directed right where it is needed, at the plants roots. Sprinklers, in contrast, spray water up in the air where it is more likely to be evaporated and wasted. Sprinklers frequently over spray where water is not needed and shower the plant's leaves which may encourage disease instead of watering at soil level.
I'm sure there are many other ways to conserve water. What works for you?

This post is linked to Frugal Fridays at Life As Mom.

Tuesday, June 22, 2010

Easy No- Knead Sticky Buns

 Today, Ed's nephews came over for another bread baking lesson. We made the ultimate comfort food - sticky buns! I love my mom's sticky bun recipe but wanted something a little simpler. Last week I made three sticky bun recipes. (Ed loves when I get on one of these experimenting binges!) This recipe was simple and very yummy! Eat them warm with a big glass of milk! Mmmmm!
Easy No-Knead Sticky Buns

Adapted from Mennonite Girls Can Cook

3/4 cup warm water
1 cup warm milk
1 1/2 T instant yeast
4 eggs
1/2 cup honey
1/2 cup butter, melted
1 1/2 tsp salt
5 cups whole wheat flour
2 cups white flour
3 T vital gluten (optional)

Mix together water, milk, yeast, eggs, honey, and butter. Stir well.
Add whole wheat flour, white flour and vital gluten and stir well.
Allow to rest for 5 minutes.
Stir, adding additional flour if needed. Dough should be sticky. Do no be tempted to add too much flour.
Place in greased bowl, cover and allow to rise.

Topping: (also called the slurry)
1/2 cup softened butter
1 cup brown sugar
1/4 cup honey
pinch salt
3 T water
1 cup pecans, almonds, or walnuts if desired

Cream topping ingredients (all but nuts) together. Spread topping in two 9x13 pans or four round cake pans. Sprinkle nuts if desired.
Filling:
1/4 cup melted butter
1/2 cup brown sugar
cinnamon

After dough is risen, divide dough in half. Roll out half the dough into large rectangle about 12x18 inches. Spread dough with half melted butter and sugar. Sprinkle generously with cinnamon. Roll up from long edge. Slice dough into 12 rolls. Place on top of topping in prepared pan.
Repeat with other half of dough.
Allow to rise until double.
Bake at 375 degrees for 20-25 minutes.
While still warm, flip the sticky buns out onto a baking sheet.
Variations:
  • For cinnamon rolls, omit the topping and bake rolls in greased pan. Add your favorite caramel frosting if desired.

  • For added flavor in the dough - allow dough to rise in the refrigerator overnight or up to four days.

  • For quick cinnamon buns any time, place sliced rolls on a baking sheet lined with parchment paper. Immediately place in the freezer. When frozen, place in sealed bag. Two or three hours before baking, get rolls out of freezer and allow to rise and bake. Also may thaw and rise overnight in the refrigerator for ready-to-bake cinnamon rolls for breakfast.
Linked to Tasty Tuesday.

    Monday, June 21, 2010

    Book Review and Giveaway - Saving the Seasons

    For those of us who enjoy gardening or strive to eat locally grown foods, the next obvious step is to find ways to extend the seasonal food by preserving  our harvest.

    I've been looking for a good "how-to-book" for home preserving. I'm often asked questions about canning and I wanted a book to recommend for beginners, one that would cover both freezing and canning fruits and vegetables. It would clearly explain the process with words and photos to teach a beginner and inspire a veteran.

    Herald Press, the publisher of the excellent Simply in Season and Mennonite Country-Style Recipes, sent me their new Saving the Seasons. In the last few days, I've read the book cover to cover, and found many recipes I want to try this summer.


    Saving the Seasons: How to Can, Freeze, or Dry Almost AnythingSaving the Seasons includes three sections, canning, freezing and drying. Each section includes specific directions for each fruit or vegetable, clear photos to demonstrate the technique, and many recipes. The gorgeous photography adds inspiration. Besides basic information, there is tips for making baby food, jerky, drying herbs, and freezing meat.


    Whether you've never canned, or are searching for a new relish or chutney recipe, or like me, constantly bombard your mom with phone calls during canning season, I think you'll find this book helpful.

    Best of all, the publisher sent along another copy of Saving the Seasons to give away to a reader!

    Just leave a comment, share your experience in canning, freezing or drying produce and you'll be entered into the giveaway! Please remember to give me a way to contact you. And I'll have to ask for US addresses only. (I do love the rest of you, too, just not the postage!) Giveaway will be open for one week, now until June 28.

    Even though I received a review copy of this book, all opinions express here are my own.

    Saturday, June 19, 2010

    Q&A - Mennonites

    Debbie asked a question in the comments the other week that I thought I'd answer in a post. Maybe more of you readers have had similar questions.

    "I have been reading your blog over a year now. Love it so much. I am just curious. I live in East Tennessee and the Mennonite community in this area have no electricity and use horse and buggy for transportation. What is the difference in the different ways of life for a Mennonite? I love your lifestyle and I think this whole Homestead lifestyle has been taken from how the Mennonites live their lives. If you would, sometime in your post would you explain this to those of us who are unfamiliar? I love learning about other lifestyles and people." - Debbie

    First, thanks for sticking around so long, Debbie! I didn't know that I had any readers (besides my mom and my husband) that have been reading this blog for a whole year!

    I hesitate to use the word "Mennonite" to describe myself. I would much rather be known as a Christian, a Christ-follower and a Child of God then by any particular church denomination name. I chose to include "Mennonite" in my profile description because I often am curious when reading other lady's blogs about their beliefs.

    As Debbie alluded, there is a huge difference in various Mennonite churches. Some, like Debbie's neighbors, avoid modern technologies such as electricity and motor vehicles. At the other extreme are Mennonites who are indistinguishable in appearance from the world around them. Obviously, since I'm using a computer, I don't fit in the first group. I'll try to share briefly what we do believe and practice.

    I am first of all a Christian and my desire and goal is to follow Christ and the New Testament Scriptures as closely as possible. In many ways, our beliefs, as Mennonites, are similar to other Protestant believers. We believe that the Bible is God's Word and without error (2 Timothy 3:16). We believe that God created a perfect world (Genesis 1:1), that sin entered the world through the choice of Adam and Eve (Romans 5:12), and since then all humans have sinned, including me (Romans 3:23). My sin separates me from God and results in death (Romans 6:23) but God through His love and mercy sent His Son, Jesus Christ to die for my sin (Romans 5:8).

    I will highlight a few of the New Testament commands that affect some of the decisions we have made that may set us apart from other Christian churches. Please, in no way take this as judgment against any other Christians, but only an explanation of our choices. None of these things are an attempt to gain us salvation or pardon from our sin. Jesus' death completely fulfilled God's demands. My only goal is to be obedient to God and the Bible out of love for my Lord and Saviour.

    Some of our specific beliefs and practices include the following:  I wear a covering on my head as a symbol of God's order of headship (1 Corinthians 11:5). Because of Jesus' command to love your enemies (Matthew 5:44), we do not join the armed forces or retaliate in other ways such as going to court. For the purpose of modesty and to not follow the world's idea of fashion (1 Timothy 2:9-10), I wear a cape style dress. While we do have electricity, cars, and computers, we avoid the world's entertainment (Romans 11:2) and do not have television or radio, watch movies, or follow professional sports.

    When many people think of Mennonites, they conjure up a picture of a large family working together on a farm and selling baked goods at the end of the lane. Maybe I've contributed to that vision by writing about my chickens, garden, and bread baking. But, in a way, that view of Mennonites makes me sad. The Bible says Christians are to be known for their love for each other, not for their pie baking skills.

    Maybe Mennonites have gained the reputation as "homesteaders" because often they have lived in rural areas. With the desire of raising a Godly family, many men wish to work with their families in home businesses. In areas such as Lancaster County, PA and Holmes County, OH the tourism industry has given many families the opportunity to support their family by raising produce and selling baked goods.

    But while I believe the country life is a great lifestyle and a wonderful place to raise a family, I also know Godly Mennonite families who are raising their children in city settings. In our congregation, we have only two farmers. Many of the ladies in our church have a garden but some choose not to garden because of location, time or desire. Many of us sew since it is quite difficult to find modest dresses at the shopping mall. But knowing how to can, sew, or grow green beans are not commanded in Scripture and in no way required to be part of our congregation!


    Just for a little personal history, I did not grow up in a Mennonite church. My family was part of a Brethren congregation that is in many ways similar to the Mennonites. When I married my husband, we made the decision to make his Mennonite church, our church home. At the time it seemed like a difficult move but almost eight years later, I do not regret the decision.

    I hope I've answered some of your questions. I have no interest in starting a debate but please feel free to comment or email me if I have been unclear or if you have more questions. For more information on the web, visit Anabaptist.org

    My desire is that each of us would grow more like the Lord Jesus Christ and that in this small corner of the web you will see the light of Christ.

    Friday, June 18, 2010

    Please pardon...

    ...as we make a few changes around here. Things may look rather strange for a while.

    And just a quick "heads up". If you are at all interested in freezing, canning, or preserving garden produce, you'll want to check back next week for a giveaway! 

    Wednesday, June 16, 2010

    On Thistles

    We have an abundance of thistles. If thistles were marketable or edible, we would have it made! My husband was once paid for every thistle he would hoe out. It was the perfect endless job where a boy could earn as much money as he had time, energy, and sweat. In a few years, I expect my husband to hand the grubbing hoe to his sons but for now, his war with thistles continues without the cash reward.

    Across the road from our house is an abandoned farm. The house and barn are falling in and the fields lie fallow. It is a shame to see rich productive farmland return to trees. Before the woods totally takes over the acreage, the fields are host to an amazing crop of thistles. In the summer, the goldfinches are in their glory eating thistle seed. We do enjoy the wide variety of wildlife that lives around this abandoned homestead, but every breeze brings a new crop of thistle to our property. It is no wonder Ed has given up on ever having a thistle free pasture.
    One of the conversations I remember from our honeymoon was choosing a name for our new home. We knew we wanted to incorporate the word "thistle". There is hardly a level foot of ground on our almost three acres, and we thought of "hollow" described it well. We weren't sure how to put it all together. We were staying in the tiny town of Talkeetna, Alaska for the night when we noticed a little gift shop called Thistleberry Gifts. That was the inspiration needed. Thistleberry Hollow was the new name for our little home.

    When I discovered blogs, I always thought, if I'd ever start a blog, I'd use the name Thistleberry. As it was, I didn't have any intention starting a blog. What would I ever have to say! (Grin) When I started a little email newsletter for homemakers, not much thought went into the name "Home Joys". This blog "accidentally" took form from the newsletter, since I found out I have far more to say then I'll ever find the time to type!
    This week Ed said he was going to attack our pasture thistle crop. I grabbed the camera and tried to capture some of the beauty of the flowers. As much as we hate thistles and are reminded of the curse put on the world after Adam and Eve sinned, even here, beauty is found.

    For the rest of the day, I've been thinking of finding beauty amongst the thorns. I'm the first to say that my life is blessed. I don't have any hardships compared to many who experience daily pain, heartache, persecution and rejection.

    But so often, even in my life surrounded with blessings, I have only eyes for the thistles. I see the dirty floor, the sink full of dishes, and the ornery children. I rub my aching back and wish for miracles of spotless house, full cookie jar, and cheerful faces. I forget about the four healthy children whose feet drag in the dirt, tummies fill with food, and loving snuggles at bedtime make it all worthwhile.
    Oh, how I need God to give me a heart of gratitude!

    Want to join me in watching for blooming thistles?

    Tuesday, June 15, 2010

    The Last Strawberry

    This morning Ed and I were up early picking peas, asparagus, and strawberries before the children woke up. We only got two quart of berries and since there was barely any unripe berries left in the patch, we decided to call the strawberry season over.

    We picked 68 quart of berries, the best year we've ever had. It seems a shame to get rid of the patch but it is over five years old and getting weedy. We had started a new patch at another location early this spring. We will till this patch and plant a late patch of beans or corn.

    When I had described our patch as "small" in an earlier post, a reader asked how big our patch was. I thought it was 25 feet long but my husband tells me my estimation was off. I got out the measuring tape and discovered it is actually 42 feet long! Maybe you wouldn't consider that so small!

    Five or six years ago, we bought 25 plants for about $10.00. We planted one row of berries. After a couple years, the row had grown very wide. We tilled down the center of the row to rejuvenate the patch and form two rows. If the patch had not become weedy (or more accurate thistlely!) We could have again rejuvenated the patch by tilling up the mother plants and allowing the runners to form new rows.

    Not every year was as good as this one. Two years, a critter (we guess deer) ate about half the patch in early spring. The plants survived and regrew but did not produce berries that year. Most years we picked about 40 quart. We've never had any damage from disease and have never sprayed the patch. Besides weeding and picking, they have taken very little attention. Last year, when the berries were finished, we actually planted sweet corn over the berry plants. From this spring's results, it sure doesn't seem to have hurt them and it was a great way to maximize our garden space.

    Can you think of a better return on a ten dollar bill?

    Monday, June 14, 2010

    June Garden Tea - and Strawberry Scones

    A June garden tea

    enjoying fellowship with moms and daughters from church

    with lots of yummy food!

    Strawberry Scones

    You don't need a tea party to find an excuse to enjoy these easy summertime scones. I want to try them next with blueberries!

    1 cup strawberries (chopped into small pieces)
    3 T sugar
    1 cup white flour
    1 cup whole wheat flour
    2 tsp baking powder
    1/4 tsp salt
    6 T butter, cold
    2/3 cup milk

    Combine sugar, flour, baking powder, and salt. Add butter and cut in with pastry cutter or knife. Stir in fruit. Add milk and gently stir.

    Turn dough onto floured surface. Knead gently and briefly. Sprinkle dough with flour if sticky.

    Divide dough into two balls. Pat dough into a circle about 3/4 inch thick. Cut into 6-8 wedges. Transfer wedges to baking sheet.

    Bake at 400 degrees for 15-20 minutes, depending on size and thickness. Serve with whipped cream.

    Thursday, June 10, 2010

    Strawberry Pretzel Dessert

    This is one of my husband's favorite desserts and one that I almost forgot to make this year. There is something about the salty pretzels, cream, and strawberries that combine in a dessert that really is good. The layers take a bit longer then some recipes but it isn't difficult.

    Crust:
    2 c. crushed pretzels
    3/4 c. melted butter
    3 tbsp. sugar

    Mix. Press into a 9x13 pan. Bake at 350 degrees for 15 minutes.

    Filling:
    8 oz. cream cheese, room temp.
    1/2 c. powdered sugar
    8 oz. Cool Whip (or one cup of whipping cream beaten with a little sugar)
    2 cup mini marshmallows

    Cream sugar and cream cheese. Fold in Cool Whip or whipped cream. Add marshmallows and spread on cooled crust.

    Topping:
    1 (6 oz.) box strawberry gelatin (or 2/3 cup)
    2 1/2 c. boiling water
    1 quart chopped strawberries

    Dissolve gelatin in water. Chill until slightly thickened. Stir in strawberries. Pour over cream cheese layer. Chill for several hours before serving.

    Tuesday, June 8, 2010

    Rosemary Peasant Bread

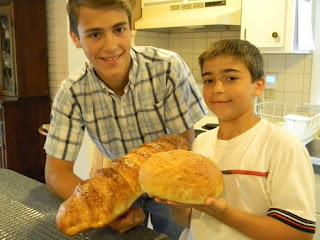
    Today two of Ed's nephews came over to learn to bake bread. I don't know what they thought of the morning, but I sure had fun!

    Ed has been encouraging me to hold a bread baking class. But I am sort of embarrassed. Doesn't it sound self-promoting to offer to teach something? I suppose that is what I'm doing here on the blog but I can pretend no one is reading and I'm just writing all this for my daughter.

    Anyway, I was thrilled when his nephews said they wanted to learn to bake bread over summer vacation! Any excuse to bake bread! And they even did the dishes!

    When I asked what they wanted to learn to bake, they said Macaroni Grill's Peasant bread. A quick google search brought numerous recipe ideas. I combined a few recipes to make this version. Whether this is close to the actual bread at Macaroni Grill, I don't know, but it is tasty and very easy to make. The perfect bread for beginners. We also made pizza dough and miracle bread.

    If you were at Melody's talk on Monday, this is the peasant bread you had!

    Rosemary Peasant Bread
    • 1 T. yeast
    • 2 c. warm water
    • 1 T. olive oil
    • 1 T. sugar
    • 1 1/2 tsp salt
    • 1/2 tsp garlic powder
    • 4 c. flour
    • 1-2 tsp fresh Rosemary plus more for topping
    Dissolve yeast in the warm water and sugar. Add flour, salt, garlic powder, oil, and rosemary and stir until blended. Rest for five minutes. Stir again and add more flour if needed. Dough will be sticky and barely manageable. Do not Knead!
    Move dough into greased bowl. Cover and let rise for 1 hour or until double in size.
    Remove dough from bowl. With oiled hands, form into loaves and place on greased pan. Spray top with oil and cover with plastic wrap. Let it rise another hour.
    Brush each round with beaten egg and lightly sprinkle with more rosemary and coarse salt. Bake at 425 for 25 minutes.
    Cool slightly, then tear off a piece, dip in olive oil or melted butter and enjoy!
    Variation: We like it with some whole wheat flour substituted for the white.

    Monday, June 7, 2010

    Strawberry Glaze

    Several of you asked about the strawberry glaze I mentioned last week. This recipe was shared with us last year by a friend. Not only did she share the recipe, but also gave us a container of the glaze with an angel food cake. It was delicious, but with a new baby, I didn't make any last year. (The baby was my excuse for anything and everything I didn't get done last year. Too bad I have no excuse this year!)

    Note: Therm Flo is similar to Clear Jell but used for canning and freezing. I found it at my local bulk food store.

    2 cups sugar
    4 T Therm Flo
    4 cups boiling water
    8 T strawberry jello
    2 quart sliced strawberries

    Mix sugar and Therm Flo together. Add water and jello. Mix and allow to cool. Pour over strawberries and pack into freezer boxes.

    Variation: Also good with fresh peaches and peach jello.

    Saturday, June 5, 2010

    Seasonal Recipe Organization

    For the last two weeks we have been picking strawberries every other day. Our small patch is yielding a bumper crop and we've picked over 50 quart - and they are still coming!

    Besides eating fresh and giving away to neighbors and friends, most of the berries I am freezing. We love kefir smoothies and I hope to have about 50 pint of berries in the freezer to use through out the year.
    A few days ago, a friend reminded me about a strawberry glaze recipe that I was given last year. It was much like a strawberry Danish that could be frozen and was wonderful served over angel food cake. I couldn't believe I almost forgot that I wanted to try making some this year.

    Then I remembered the fruit slush which I like to make with fresh berries. When I was telling Ed about my forgetfulness, he reminded me of his favorite strawberry pretzel dessert that I make him every year. (Bang forehead.) How could I have forgotten! Some days I miss my brain! Thankfully our strawberries are not over quite yet, so I still have a chance to redeem myself.

    But when I was riffling through my recipe collection looking for the recipes, I thought that there must be a better way. My recipe collection is a disaster of far too many cookbooks, random bits of paper, and a stuffed full binder. Searching for an elusive recipe is a waste of far too much time.

    I'm thinking that a binder with recipes just for seasonal produce may be helpful. I'm visualizing a binder with categories for each fruit or vegetable. I could have a list of all the things I like to make using that item. Maybe I could also mark where the recipe can be found with page numbers, or just type off the recipes and include them in the binder. I could add an envelope for all those recipes I print off the web or pull out of magazines that I never remember when I actually have the needed fruit or vegetable.
    I need help. Maybe next year I can come back and read this post and at least remember what I made with strawberries this year. Have any of you organized your recipes this way? Does it work? Any other hints or ideas?

    Thursday, June 3, 2010

    Veggie Cheese Ball


    With the hotter weather, all I feel like doing is snacking on food like this cheese ball. A friend gave me this recipe years ago and it continues to be a yummy way to sneak in some extra raw vegetables!

    1 cup shredded carrot
    1 cup diced broccoli
    4 oz. shredded Cheddar cheese
    8 oz cream cheese
    1 tsp diced onion

    Mix all together. Form into a ball. Refrigerate. Enjoy!

    Tuesday, June 1, 2010

    Hoop House Update

    We all know we should eat more fresh fruits and vegetables. Here in June, we are relishing the fresh salads, strawberries, asparagus, and peas from the garden. It is easy to forget the long cold days of winter when fresh vegetables were only available in our dreams or shipped from sunnier lands. Maybe I'm odd, but it really bugs me to purchase lettuce that grew thousands of miles away and was harvested by an unknown person a unknown number of days ago. I try not to be paraniod but when reports of salmonella in spinach reaches the news, it has me cringing when I add greens to my shopping cart.

    I know that year round tomatoes are out of my reach without a heated greenhouse. But maybe I could grow salad greens for much of the year. If you have been reading here long, you may remember my Valentine's gift last year? I thought it was past time for an update, even if we are into the summer growing season.

    Ed built me a raised bed beside our garage. He designed it "square foot gardening" style and put up some hoops to support some row cover. The folks at VeggiCare gave us a piece of their row cover fabric called GrowCover (formally named Mikroclima) to test.

    Except for the hottest months of summer, this little hoop house has been in constant use this past year. We grew lettuce, spinach, kale, and broccoli last spring. In the fall, I planted kale, spinach, and several types of lettuce. I really expected the plants to die in the coldest part of the winter. The spinach and kale grew very slowly in the cold weather, but the lettuce flourished. Between Christmas and New Years, we enjoyed a fresh salad from the hoop house.

    In early January, the weather turned colder. The lettuce plants went mushy and I figured that would be the end of them. A foot of snow buckled the hoops. We would need stronger supports. We had much more snow then normal through January and February.
    When the snow finally melted, I cleared off the hoop house and Ed put in some stronger hoops. I was amazed to see those once frozen mushy lettuce plants were pushing out new leaves. In the first week of March we picked our first spring salad! Spring eating had begun!

    What we have learned:
    Colder weather and shorter days severely slows down plant growth. To compensate, I need to plant a larger number of plants. Also, I need to make sure that the plants get established well before the colder weather sets in and slow the growth.

    Snow has an amazingly insulative effect. Next year I want to borrow and idea from Four-Season Garden and use a double cover, one right over the plants and one over the hoops.

    We continue to be amazed at the strength and durability of the GrowCover. Even with a foot of snow and over a year of use in the garden and hoop house, it appears to show no wear. We have had other brands of row covers who have torn in the first month of garden use. We had considered replacing the GrowCover with plastic but did not. Plastic would have certainly torn with the weight of snow. Plus we would have had to ventilate on hot days and opened it to water. The GrowCover allows air and water to pass through while still providing protection for the plants.

    If this past year we had fresh salads for all but two months of the winter, this coming winter I want to aim for fresh salads for all but one month! I know this is an odd thing to talk about now, in the summer, but fall/winter garden depends upon early planning.

    Have any of you had experience in winter gardening?

    LinkWithin

    Related Posts with Thumbnails