Monday, April 29, 2013

How to Make Dandelion Chains


This past week my daughter asked me how to make dandelion chains. I couldn't believe that somehow in nine years we had missed making dandelion chains together! 

But it is never too late! Little sister joined in the fun.


Green grass and sunny yellow flowers. What can be better than springtime?

Here is how to make your own dandelion chains.


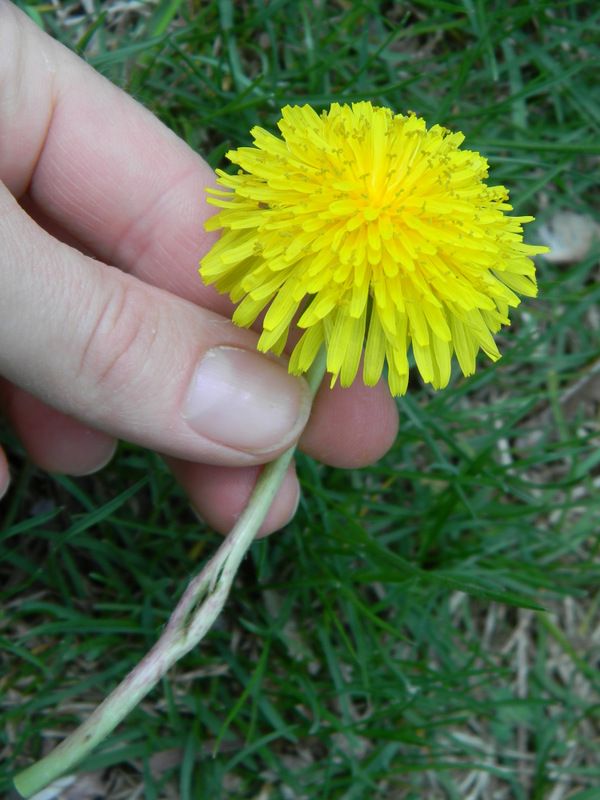
Gather a handful of dandelions. Be sure to include some stem.


With your fingernail, pierce a hole in the stem. Don't get it too close to the bottom.


Take the stem of another dandelion and push it through the hole.


Keep adding until your chain is as long as you want. A couple days later, my son made a dandelion chain that was over ten feet long!


If you want the chain to connect into a circle, make your last hole a little larger and push the flower head of your first dandelion into it.

Enjoy springtime!

Friday, April 26, 2013

Cowboy Bars


My brother loved coconut (probably still does!) and I remember him helping to mix up a batch of cowboy cookies. Possibly the name had an added appeal to  a young boy.

I had totally forgotten about cowboy cookies until I found a recipe for cowboy bars. They are exactly what I remember the cowboy cookies tasting like. We now have a new family favorite.

Cowboy Bars

slightly adapted from the Charm Countryview Favorites
  1 cup butter
1 cup brown sugar
1 cup white sugar
2 eggs
1 1/2 tsp vanilla
1/4 cup milk
2 cup flour (white or whole wheat)
1 1/2 tsp baking soda
1/2 tsp salt
2 cups quick oats
1 1/2 cups chocolate chips
1 cup chopped nuts
1 cup coconut (optional)

Cream together butter and sugars.
Add eggs, vanilla, and milk and beat well.
Combine flour, baking soda, salt, and oats.
Stir in chocolate chips, nuts, and coconut.
Spread in a greased jelly roll pan (or two 9x13 pans) Bake at 350 degrees for 25-30 minutes.
Yummy!

Wednesday, April 24, 2013

Winter Projects - Tied Quilt

This winter I wanted to teach my daughter how to use a sewing machine. I thought that a quilt would be the perfect project, especially since I have lots of scrap fabric for her to practice with.


We chose a rather large square (six inch) for a pattern to make it easy to cut and sew. We arranged the squares in the Around the World pattern with one square in the middle, then another fabric around that square, a different fabric for the next round, and so on. 


After she sewed all the squares into strips, I sewed the strips together. The final quilt was big enough for a double bed. We then layered the batting and backing with the front and stitched it together and tied knots. Officially, I guess this isn't a quilt because it isn't quilted but ties were much easier (and faster) than quilting.

Most of the fabrics are from my girl's dresses so it makes a nice memory quilt. My daughter chose the brightest colored scraps which makes the quilt rather busy but certainly makes a cheery quilt for her room!


My son wanted to join the fun too. He took the small scraps after we had cut the larger squares and cut little three inch squares and sewed them together randomly into a small baby quilt. He loved running the sewing machine - maybe a boy's love of motors? His seams were not even and many of the squares were not square but it should still be warm. He donated the quilt to a relief organization to give to a needy family overseas. 

Both children loved sewing by machine and are begging me to start another project. Maybe next year I'll pull out all my boxes of scrap fabric and let them make some more quilts to donate.


Friday, April 19, 2013

When Cardboard Won the War

A guest post by my friend Regina. She is the talented lady who has shared with us how to save flower seeds, cut out sugar, and cook with natural sugar.


When Cardboard Won the War

It was spring. The air was alive with the excitement of warmer days and new life. My heart beat with pleasure at the thought of once again working in my flower beds. I gathered my hoe and shovel ready to dive into the bliss of dirt, when I was stopped by an ugly sight. My herb garden with raised beds and walkways was overrun with this horrible-refusing-to-die grass, the hard-to-pull kind of grass with long, strong runners under the soil. Hadn't I beat that evil grass with the hoe last year – chopping its roots and yanking its blades? But there it was, flourishing with every passing day. Must I resort to spraying chemicals on my own ground?
A few days later while waiting on my daughter at the orthodontist, I picked up a Birds and Bloom magazine. I read with interest an article about gardening with cardboard.
H-m-m, cheap cardboard. Something we burn or trash all the time. Layering my flower beds with cardboard to smother the weeds, something non toxic – the idea appealed to me. I began to save every cereal box, cracker box, even the butter boxes, and was amazed at how much cardboard I had thoughtlessly pitched every day.
After collecting a bagful of my ammunition I decided it was time to start: Operation Down With The Grass. First, I went against my organic preference and sprayed the grass with weed killer; this was an out-and-out war I was waging. A week later, my husband weed whacked the grass off low to the ground. Now came the cardboard. Dragging out my trash bag full of boxes, I let the children have a grand romp tramping the boxes flat. I laid the flattened boxes in my walkways covering the dead grass. 


 My husband came over to inspect my work and proclaimed it a hill-billy job. I said I was diminishing my carbon footprint. The only problem I encountered was finding out my bag of cardboard ammunition would not near cover my walkways. Where could I get more?
The next day while cruising the aisles at the grocery store, I passed a boy stocking the shelves with cereal. What did I see lying on his cart but lots and lots of large flattened packing boxes!
“Hey,” I said. “Could I by any chance have that cardboard?
“Sure may,” he replied. I'll take it up front for you.
I was as excited as if I had won a door prize. Back home, I carted my boxes out to my garden, ignoring my husbands rolling eyes, and continued my war on the grass.
My next step was hauling wheelbarrows of mulch and dumping on top of my boxes. I spread the mulch evenly over the cardboard hiding my free, hill-billy-like weed cover. I was delighted to let my husband know I did not need to spread my mulch as thick as usual, hence saving him money. I surveyed my hard work. All that could be seen was dark mulch-covered-walkways. Even the husband couldn't find fault.
 

My Operation Down With The Grass was finished. I hoped. Next spring, I'll see who won. In the meantime, I hope the worms are impressed that Mrs. Paul's fish fillets contains whole pieces of fish.
 

Authors Note: It is now a year later, and I see that I have won! There are a few weeds, but they are growing on top the mulch. Last summer, I also experimented with layering newspapers in the garden rows topped with grass clippings for weed control – with great success. The newspaper and cardboard dissolve over the months and tilled into the soil. If you have a compost pile, mix your newspapers and cardboard into your pile. Over time, it breaks down and is a great way to recycle your old news! 


Thanks, Regina for sharing your mulching experience. I have used cardboard in my berry rows but never in my flower bed. I think I'll change that this year!

Thursday, April 18, 2013

Make Your Own Free Liquid Fertilizer

Gardeners are frugal folks. If we can make it ourselves, we will!

I'm always looking for ways to have a better garden for less money. I've read several places about making liquid fertilizer, sometimes called manure tea, to give a boost to plants.

It is super simple. Here is how I did it.

Place your dry ingredient into a five gallon bucket. I used chicken manure mixed with wood shavings - filling the bucket about a fifth full. You can also use fresh grass clippings but then you would want to fill the bucket about 2/3 full.


Fill the bucket with water and let sit for three days. Stir about once a day. I sat the bucket by my compost pile, covered it loosely with a lid, and warned the children to not play in it. After three days, the nutrients should have seeped out into the water. Longer than that will just increase the stinky fermentation!


Strain the liquid into another bucket. I used a piece of fencing but the holes were hardly small enough to trap all the solids. I need to look for an old strainer at the thrift store that I could keep out in my garden shed for the purpose. I threw the solids in my compost pile.

The strained "tea" needs to be diluted before using it to water plants. Dilute both manure tea or grass clipping tea one to one.


Then pour it into your watering can and go find a hungry plant! Use it up in a day or two. You can pour any extras on your perennials or your compost pile.

Like any time you fertilize, be careful you don't fertilize plants that are drought stressed. Water your plants first, then fertilize.This time of year, as the perennials are coming out of dormancy, is a great time to fertilize. It is hard for plants to get nitrogen from the soil when it is cool. You can use the fertilizer on potted plants and I even used this homemade fertilizer on the plants I was starting indoors from seed.

Have you tried making your own fertilizer? What is your favorite frugal gardening tip?

Tuesday, April 16, 2013

Easter Sunday in Guatemala

 The last couple weeks have been busy with birthdays, sick children, a trip to Philadelphia for a field trip, a push to complete school work for the year, computer problems, and garden planting. I do plan to return to my normal posting here at Home Joys eventually.  But here is one last post on our Guatemala trip.

Without daylight savings time, the sun rises early in Guatemala but we had decided to enjoy a sunrise service on Easter morning out at The Hill. We gathered breakfast, blankets, and sleeping children for a shivering 4:30 ride on the tractor through the darkness.


The view was worth the sacrifice of sleep.


We sang songs of the resurrection (in English and Spanish) while watching a huge star-filled sky turn pink and rosy.


The sun popped over the hills to greet a gorgeous Sunday.


Benj and Holly warmed us up with pancakes cooked over a campfire.


Then we hurried back home to prepare for church. Any early morning goose-bumps were forgotten while walking the mile to church. I kept stopping to take photos of the flowers blooming on the fences along the road - and made Ed late for church! But they were so beautiful!


It was a busy time because the Gethsemane Mennonite church was hosting special meetings this weekend. Easter is a time to visit family and friends in Guatemala and there were many visitors.


During the church services that we attended while in Guatemala, I was so encouraged to see the young men taking leadership roles in the church. When I had last visited Guatemala, some of these men were only youth, but now they are married, with children, and a huge blessing to the church.


The goal of Mennonite Air Mission is to establish indigenous churches - churches led by native leadership. It was good to see and hear some of the fruit of that vision. I just wish I knew how to speak Spanish so I could have enjoyed more of the sermons and the fellowship. After the morning service we enjoyed a wonderful lunch with more great Guatemalan food including lots of corn tortillas! Even the evening services ended with yummy snacks like fried tortillas layered with black beans and fresh Guatemalan cheese!

 
The youth girls sharing a song

That is a glimpse of our Guatemalan trip. If you ever get a chance to visit the mission work in another country - take it! Even if you are woken by roosters, you won't regret it!

Now I'll get back to sharing what I'm growing and cooking in Pennsylvania!

Monday, April 15, 2013

Hog Butchering - Guatemala Style

(Note: This post is about raw meat and contains pictures of such. Consider yourself warned.)

One of the projects we got into in Guatemala was hog butchering. Since I've written about my family's hog butchering numerous times, I thought I'd share some how they did butchering there.


The hog arrived already killed and gutted. The men left their building project to skin the hog and help cut it up. Back home, we always butcher the hogs in the cold winter weather - never 100 degree weather! But it couldn't be helped.


As quickly as possible the hog was made into small chunks and placed in the freezer. Not wrapped or anything, just dumped in. Then the men returned to the building and the women took over.

I've shared lots of photos of our home butchering projects in the past, but to be honest, I don't really do the butchering. My role is meat wrapper, lunch maker, baby sitter, and, of course,  photo taker. But here the women folk did the majority of the butchering.


Holly and Kendra got out one chunk of meat at a time out of the freezer. They de-boned, trimmed, and wrapped the meat and returned it to the freezer. Somehow I missed getting any photos of the rest of the day. They made sausage using the meat grinder on Holly's Kitchen Aid mixer. Since they were doing small batches, Holly added various types of spices to different batches. The sausage I sampled was delicious!

All the fat was placed in a pan and cooked down to make lard. The meat cutting was completed by evening but the lard making continued into the night. The result was some beautiful white lard.

The bones were collected into a huge pot and boiled for hours. The next day the broth was made into pon haus. We sampled the result at breakfast. Yummy!

A lot of work but some great meat as a result! And I enjoyed seeing how hog butchering can be done in a kitchen with few butchering tools.


LinkWithin

Related Posts with Thumbnails