Wednesday, October 12, 2011

First Attempts at Dehydrating

I'm having so much fun with my new dehydrator.


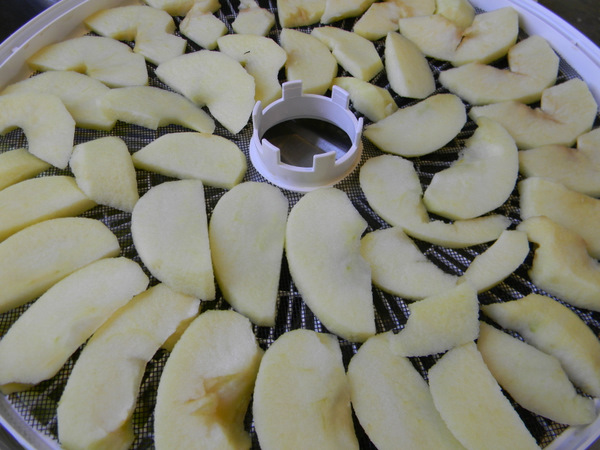
So far I've dehydrated more herbs, lots of apples, peppers and onions.


The children are loving the apples. I think most of what I dried are already gone. They were perfect for stuffing in a pocket for a hike.


As usual, my onions were starting to go bad.


Dehydrating them will hopefully give me some onions over winter.


I blended them to add to soups and casseroles.


I am amazed at how much less space dried vegetables take.


I started with a sink full of colorful peppers,


chopped them up, dehydrated them,


and they all fit in a pint jar!

For those interested, the dehydrator I was given is similar to this one. (You can click on the picture to get more info from Amazon.)

I have been very pleased with the speed and the ability to choose different temperatures.
But now I need help. I know how to use dried herbs or apples, but how I do I use something like dried peppers? Should I soak them in boiling water before cooking with them?

I'd appreciate any information you can give on dehydrating, especially on re-hydrating. If you have written about it or know where to find good web info, I'd love if you share the link!

Tuesday, October 11, 2011

Applesauce and the Blame Game

I was in a frantic scramble to turn apples into sauce before any more rotted. The clock was ticking, my time limited, and each movement needed to count.

A row of jars stood on the counter, awaiting lids. As I stretched to reach over the jars, one jar toppled. Applesauce splashed across the counter, down my dress, dripping to the floor.

I looked quickly for broken glass and grabbed a towel to stop any further mess. Although grateful to find the jar unbroken, I found myself looking around in irritation.

But I was alone. No one was in the kitchen but me. With shock, I realized I was searching for someone to blame. I shudder to think what words would have escaped if the usual bevy of children had been at my elbow. I heard their happy voices playing in a nearby room. This time, there was nothing but my own clumsiness to blame.

For the next several hours, while washing apples, stirring pots, squeezing sauce, and scrubbing pans, I had much to ponder. How often do I lash out at my helpers when an accident happens? Do I always blame others in times of difficulty, big or small? Do I never stop to consider that maybe I am the one to blame?

The reaction is as old as our Grandmother Eve. I blame the serpent. The children You gave me. My husband. Or the house, the weather, my aching back, the economy, her, him, them, it...endless the things, people, and circumstances at the focus of my anger.

What if I turned my accusing finger inward? If I said, "I have sinned. I was impatient. I knocked over the jar. I spoke unkindly. Please forgive me." Would my heart then be lighter, the burden lifted? If I turned my frustrations into songs of joy, would I find the “joy of the Lord is my strength”? Could I carry my burden, the endless tasks, the time limits, the uncomfortable circumstances to my Father and there find the promised rest?

Some days it seems impossible to find the time to sit at Jesus' feet, this needful thing that Mary chose. But I can choose to spend time in His Word and tune my heart to His voice. If I want to stop blaming my circumstances, I need to start working on the person I can change.


Then when applesauce spills, may only loving words escape.

Monday, October 10, 2011

Saving Flower Seeds

Guest Post by Regina 

Sunshine!!  Oh THANK-YOU God!!  I feel like a bear coming out of his hibernation into the glorious warmth and happiness of the sun.  I WANTED  to be outside, I HAD to be outside, I NEEDED to be outside, and so outside I went!  I started to work amongst my flowers and realized this would be the perfect day to do something I needed to get done before the first frost.  I would collect seeds from my flowers for the next year.  This is a job I love, to look deep amongst my flowers and find those fat and full seed pods that would supply me with bright, cheerful flowers next year.  I gathered my Ziploc sandwich bags and a marker and started my treasure hunt.  

This is a seed pod for petunias.  You need to look for a pod with the flower petals gone and the pod needs to have turned brown.  Some pods are still green and the seeds will not be dry enough in those.  This one was just perfect!


I snapped the stem, and pulled off the remaining leaves. 
                                

I then place it inside my Ziploc bag and gently squeezed it open.  The pod can be tight and sometimes I need to use my fingernails to gently pry the pod open.  Some pods will already have cracked open and the seeds gone, or some pods may still have a few remaining seeds that haven’t yet spilled out.  I was delighted to find this pod still tightly closed.  All the seeds inside were mine!  These seeds are VERY tiny, so be careful!  One pod has lots of seeds inside. 


Make sure to mark the bag what flower seeds you have and what color.  I have found with some petunias being hybrids, not all the seeds I saved would be the same color when they bloomed the next summer.  Most of the times, they are.  But I have had a few go back to white or sometimes they will be white with the hybrid color stripped through the white, making a very pretty petunia.  

Next was my impatiens.  These pods when they are ready to pick, are a shiny, fat, green pod. 


Now comes the fun!  These little guys are a blast to pop!  I enjoy popping them just for the fun of watching them!  My three year old was helping me hunt for the pods and she had so much fun popping these little guys open.  They are spring loaded, so watch out!  The fattest, really ripe pods, when I barely touched them, literally gave a “pop“, and all the little seeds came spraying out!  Make sure you put the pod in your bag before you pop them so you do not loose any seeds.  Here is what the pod looks like after it is popped.
                                

Don’t sneeze!  Or those tiny seeds will blow away!  Mark your bag with the color and the name of your flower!  

Zinnia seeds are very easy to collect.  Find a brown dried flower head of the color you want to save.


Now gently tear off the top dead petals. 


Underneath these petals are the brown seeds.  These seeds are nice and large!  You don’t need to worry about sneezing these away!


Save marigold seeds exactly the same way.  Marigold and zinnia seeds are one of the easiest to save and start again next year.  I like to sow my zinnias in a row in my garden and like a variety of colors, so I make sure I save at least on or two heads of all the different colors and mix them together in my bag.

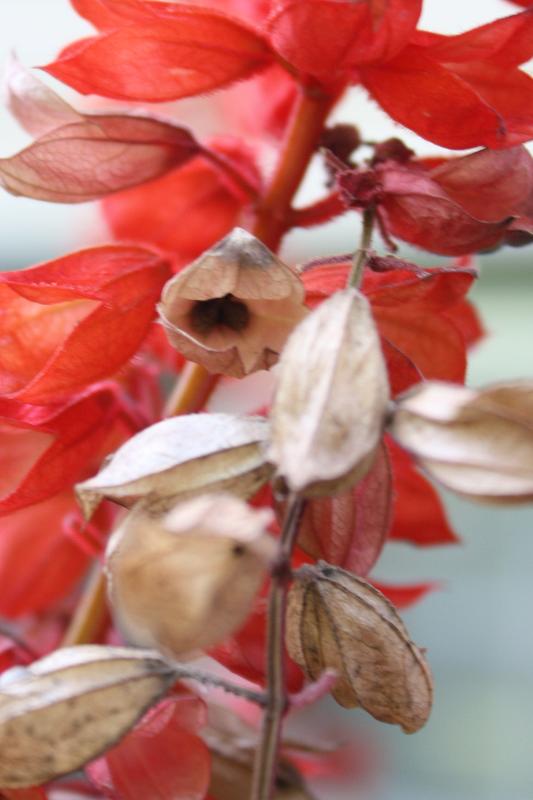
I also grow a lot of red salvia.  I can’t always find the large 16 - 20 in. plants, so I usually start my own.  Look for stems on your salvia plant that has flowers that turned mostly brown.


Do you see those black spots deep in the bottom of the brown flowers?


That is your seeds you want to collect.

Some of the seeds will have already dropped out of the flower, others will be nicely full.  There is usually only around 3-5 seeds per flower.  I pick a whole stem that is brown, put it in my bag and run my fingers along the stem, scrapping the flowers off into the bag.  Then you can tear each individual one open and drop out the seeds or sometimes by gently shaking the bag, the seeds will work their way out of the flowers. 


These seeds look larger than they actually are.  Once again, make sure you mark your bag along with the height of the plants.  I save seeds from two different heights of plants.  Next year you don’t want a 16” plant where you wanted an 8”!

Hopefully this will give you an idea of how to collect seeds from your plants!  These are some of the main flower seeds I collect for the next year, but if you have other flowers, look at them closely and you should be able to find a pod or seeds that you can save. 


Now you need to dry your seeds so they do not become moldy or sprout before you plant them!  Open the bags, roll down the tops so the tops are nice and wide open.  Let them sit in a cool, dry place until the seeds feel nice and dry and should be mostly brown.  Maybe gently stir or shake them around several times so they can all dry.  This can take up to several days.  When they are all dry, reseal your bags and store them where its dark and cool.  

Another way to dry your seeds and probably the best way, is to spread them out on a small plate.  Let them air dry for several days, and then place back into your bags.  The drawback is when I have a lot of bags with seeds, this is a lot more work and it is easier to get my seeds mixed up or spilled!
                                     

Presto!  You are done!  You have just saved yourself several dollars worth plus shipping and handling!  Now come January and February when the snow flies and the winds howl,  you don’t have to wait for the seed catalog to come in the mail.  You can get out your petunia and impatient seeds, and have fun starting them in your flats!  It will bring cozy memories of that sunny, warm, blue sky day when you collected your seeds, and it will bring more cheerful memories of those spring days to come filled with bluebirds and tender new growth of life! 

Linked to Tuesday  Garden Party

Friday, October 7, 2011

Apple Cake

There is so many apple cake recipes, but this is one of our favorites. The glaze on top adds a special touch.


Apple Cake
From Simply in Season

5 cups chopped apples
1 1/3 cup sugar (I cut back to only 1 cup)
1/2 cup oil
2 eggs
2 tsp vanilla
1 cup whole wheat flour
1 cup flour
2 tsp baking soda
2 tsp cinnamon
1 tsp salt
1 cup nuts (optional)

Combine apples and sugar. In bowl, mix oil, eggs, and vanilla. Stir in dry ingredients. Add apples. Pour in greased 9x13 pan. Bake at 350 degrees for 50 minutes. (It only took my cake about 35 minutes.)

Topping (optional)

2/3 cup brown sugar
1/4 cup milk
1 T flour
1/3 cup powdered sugar

While cake bakes, heat brown sugar,  milk, and  flour until  boiling. Remove from heat, mix in  powdered sugar. Drizzle over hot cake.

Thursday, October 6, 2011

Cookbook Challenge - Simply in Season

Problem 1 - I have a shelf full of cookbooks that I've barely used.

Problem 2 - I've been lacking inspiration in the cooking department.

Problem 3 - I've seriously dropped the habit of menu planning, and desperately need to get back to it. I hate the afternoon panic attack of "What are we going to eat tonight?"

I'm hoping to cure all three problems by starting a personal cookbook challenge. My goal is to pick one cookbook on my shelf each month to really dive into, try some new recipes, and hopefully find some new favorites.


For the last month, Simply in Season has been a standby on my kitchen counter. I love how this cookbook is organized by seasons. Flipping to summer found many ways to use my garden bounty.

My goal isn't to talk you into purchasing a new cookbook, but to encourage you to use what you have. But since I know many of you have this cookbook, I'll share a few of the recipes that have been winners at our house.

Focaccia - pg 90
Zucchini Garden Chowder - pg 95
Fahita - pg 148
Chicken Caccciatore - pg 147
Pesto Pizza- pg 123
Stacked Vegetable Quesadillas - pg 134
And that is just in the recipes I've tried recently in the summer section.

In the past, I shared the recipe for Roasted Summer Vegetables and Great Green Vegetable Pasta.
Some of the summer desserts we enjoyed were whole wheat peach kuchen,  fruit platz, yogurt fruit pie, and fruit custard pie.

But since we are now into fall, I'll share a recipe from the fall section of Simply in Season - Apple Cake. But that will wait until tomorrow.

This month, I'm sitting my crockpot on the counter and diving into Not Your Mother's Crockpot Cookbook.

I'd love to hear about your favorite cookbook!

Wednesday, October 5, 2011

Easy Canned Apple Pie Filling - With NO Sugar

Stepping in quick from a busy day of applesauce making (again!) to share a new way that I found to make canned apple pie filling.

My usual method for apple pie filling called for cooking a glaze, tossing in the sliced apples, packing in jars and canning. This new method skips the glaze/sauce. It still takes quite a while to peel all those apples but I think the work of making apple pie filling is worth the convenience of having a quick apple crisp available at any time.

The other benefit of this recipe is NO sugar! It uses only honey for sweetener. I found the recipe in Healthy Choices - a cookbook with no white sugar or white flour compiled from recipes shared by readers of Keepers at Home magazine. I adjusted it a little, including cutting the recipe in half since I didn't have any bowls big enough to mix the full recipe in.

One note - DO NOT fill the jars full! The first time I tried this, over half of the jars did not seal. My mom reminded me that apple pie filling jars should not be filled full. With this method of using water, there is no air space and is even more important not to fill the jars full. The second attempt at this recipe, I only filled the jars with water up to the shoulder of the jar, not to the neck. This time the jars sealed very well.

The original recipe called for flour for thickening. Flour made the liquid cloudy. I preferred clear gel, a thickener similar to corn starch but better for canning.

This year, my apple pie filling was much softer then last year. But I'm assuming it was because my apples were very ripe. I used Golden Delicious apples and probably should have chosen a firmer apple. But no one in my family will complain if their apple filling is completely mush. We LOVE apple desserts.

Apple Pie Filling for Canning
Adapted from Healthy Choices

6 qt apples, peeled and sliced
1/3 cup flour or clear gel
1 cup honey
2 T cinnamon
1/2 T nutmeg

Toss dry ingredients with apples. Stir in honey. Fill quart jars. Fill jars with water - but NOT to top of jar. Water bath can for 30 minutes.

To serve, dump into a casserole dish and sprinkle with any apple crisp topping recipe. Or try this frozen crisp topping.  Then bake.

Or dump into a pie shell and bake.

Monday, October 3, 2011

October in My Garden

With many days of rain this past month, gardening has been about the last thing on my mind. Besides dashing out for a pepper or to check the broccoli, the garden has been rather abandoned.

I see from my September list, that I still have things to do this fall. The late potato plants are still green, I'm still picking the last few tomatoes, and nothing has been tilled under for winter. I told Ed that this is one year that the tomatoes cages will probably stand in the garden until spring.

And at this point, I don't really care.

But maybe it will dry out enough this month to do some garden clean up. It is always nice to leave the garden as a clean slate, ready for spring planting.

October's Garden To-Do List

1. Plant some pansies and spring bulbs.

2. Make compost with the withered garden plants and falling leaves.

3. Plant garlic, if it dries enough to till.

4. Dig potatoes.

5. Trim off the asparagus, manure the bed, and cover with leaves.

6. Plant lettuce and spinach in the hoop house. (Since I kept forgetting to plant seeds, I just started some plants in the house to give them a head start and plan to transplant to the hoop house. If I'm not too late already.)

7. Clean up all garden areas and mulch all the perennial beds with chopped leaves.

What are you doing in your garden this month?

LinkWithin

Related Posts with Thumbnails