Showing posts with label sewing. Show all posts

Wednesday, October 28, 2020

Upcycled Dresses

 If you have watched me shopping at a thrift store the past months, you may have seen me looking through the extra large skirts. I was searching for long full skirts, with only side seams, in fun prints, in non-wrinkling, stetchy fabric.  


My little girls needed play dresses, and I found that I could make a simple dress in a few minutes from a large skirt. I printed off the pattern for the play-all-day-dress and taped the pieces together. Then I laid the skirt out flat and folded it in half, which made four thicknesses of fabric. I laid the pattern on the skirt on the fold line (not the side seams) and cut it out. 

In the photo above, the fabric on the right is the extra. On the left is the folded dress piece. Since the skirt was folded, I had cut both the front and the back at the same time. Then I slimply stiched up the side seams, stiched the shoulder seams, and hemmed the neckline. I used a zig-zag stitch so that the fabric could stretch without breaking the thread. I kept the original hem and didn't bother hemming the sleaves since the fabric wouldn't ravel. I also didn't put any elastic in the waist.

By the time I had made my second dress, I had gotten even faster.


My girls love having new play dresses. And I love having so little time and money in a dress.

Do you have a favorite upcycle project?

Monday, April 13, 2020

Good Shopping


My daughter said that if she had known that she'd be stuck at home for weeks, she would have stocked up on fabric to sew some dresses for herself.

Of course, we aren't going anywhere to wear a new dress, but she does need some dresses for summer, and she has extra time now.

I've never bought fabric online, but I told her to check Goods Store's website. This is a Mennonite store in Lancaster County, and I figured they would have fabric.

She found several fabrics she liked, as well as zippers to match, and we placed the order on Saturday. Today, two days later, they arrived in the mail. My daughter is stitching a dress as I type.

Good selection. Reasonable prices. Fast service. Though I like to support my local fabric stores, right now, this is a way to support another business that may be struggling since their doors have closed.

Goods Store has much more than fabric. A few years ago I reviewed their website but today they have no idea I'm writing this post.

Monday, February 10, 2020

Review: Sew Basic Ladies' Pattern

For years I have been asked how to make a cape dress. I wrote a series on sewing cape dresses but continue to be asked where to find a good cape dress pattern.

Sew Basic Patterns designed a line of girls patterns a few years ago. I reviewed both their small girls' and larger girls' sized patterns. I've used these patterns dozens of times in the last couple years, and it is the only patterns I use for my girls.

Right now my oldest daughter and I are on a sewing spree. In the past week I have cut out seven dresses for my girls using three sizes of the girls' Sew Basic pattern. They always live up to their name of being simple to sew.

Ladies' Cape Dress Patterns image 0

I kept hoping that Sew Basic would extend their pattern line to ladies' sizes. And now they did.

I was given an adult size pattern from Sew Basic to try, and now I think I found my new favorite pattern. I made the dress exactly according to the pattern. The only change I made was to extend the sleeve length and add a cuff. I chose the size by my measurements, and it fits perfectly.


The pattern includes directions though some sewing experience would be helpful. The pattern includes several options for sleeve and skirt styles.

Since women come in all shapes, the pattern includes an extra sheet of information on making pattern adjustments for various shapes such as narrow or sloped shoulders.


You can find all the Sew Basic pattern sizes on Etsy. Or email Michelle at sewbasicdresses @ gmail.com for more information.

I received a free pattern to review, but all opinions in this post are my own.

Wednesday, September 13, 2017

Question: Sewing Slips

Do any of you sew your own slips? Do you have a good source for slip fabric? Can you buy it online somewhere?

I need some new half slips for me and my daughters. I've been wearing the same ones for over fifteen years. Every couple years, I sew new elastic on the top, but by now they are truly worn out. When I shopped for new slips, I couldn't find any that were nearly long enough. And I think that a half slip would be super simple to sew if I could just find the right fabric.

And in case you are curious, for my little girls, I sew white cotton shorts. I use a knee-length pajama-shorts pattern. They are loose-fitting and suitable for church or play under dresses. In colder weather they wear leggings.

My older girls also wear knee-length shorts under their dresses for sports but like half slips for church. Any hints for finding fabric?

Monday, August 28, 2017

New Sizes: Sew Basic Dress Patterns

Last fall I told you about my new favorite dress patterns for girls - Sew Basic Dresses patterns. Since then I've used those patterns many many times and continue to be very pleased.


This summer Michelle at Sew Basic designed some more sizes. Now she has available sizes 10, 12, 14, and 16. I was thrilled. My thirteen-year-old needed more dresses so I had the perfect model to try out these new patterns. As difficult as it is to find little girl dresses, I think it is even more difficult to find modest dresses for young ladies.

The pattern includes two skirt patterns, one fitted and one pleated. It also includes two sleeve patterns, fitted and gathered. A cape pattern is included or you can choose to omit the cape and make a lined bodice if you prefer.


We made the first dress exactly according to the pattern except for lengthening the skirt by a few inches. Michelle said that because of paper size, she couldn't make the skirt pattern as long as she wished. We also added a cuff to the sleeve.


The fit was perfect for my daughter, but the bodice was a little high-waisted on her. So for the next dress I used the extension line on the pattern to lengthen the bodice. This time we used the pleated skirt. Again the dress fit perfectly.


The third dress I again used the extended bodice this time with the fitted skirt. Again my daughter was super pleased with the way it fit. The pattern fit together so well and is so simple that she was able to help cut out the dress and do some of the sewing. Hopefully with a little more practice she'll be sewing her own dresses.

You can purchase Sew Basic patterns at Etsy or contact Michelle at sewbasicdresses @gmail.com 

Disclaimer: I was given two patterns to review, but the opinions of this review are my own.

Tuesday, October 18, 2016

Sew Basic Dress Patterns

Cutting the fabric for a dress has always been my least favorite part of sewing. When I make a dress for my girls I first have to find my pattern pieces. Typically I select a sleeve pattern from one pattern, a skirt from another pattern, a bodice from a third. 

Then I start making adjustments. Most patterns don't fit our modesty standards so I add a half inch to a neckline, two inches to a sleeve, and maybe ten inches to a hem. 

Then, finally, I'm ready to cut out the fabric. The sewing itself is the fun part, except that with all my changing and adapting, sometimes pieces don't fit together well. I consider myself an experienced sewer and can usually manage to find a way to pull and push the pieces together. But it doesn't make sewing more fun.


But several months ago, Michelle Oberholtzer contacted me about the new line of patterns she was designing. This sounded exactly what I needed - simple, easy-to-sew, modest patterns.

Michelle started Sew Basic Patterns to help frustrated moms like me who just want a simple dress pattern for their girls without adjusting three different patterns to find one that works. Michelle just completed the first pattern in what (I hope) is a series of patterns.  Michelle gave me a sample copy of her girl's dress pattern to review.


The girl's dress pattern includes two style of skirt (gathered and fitted) and two sleeve options (gathered and fitted.) I tried both options and both fit together well. It was such a fun simple pattern to use. I made the pattern exactly as it was with no changes except for adding a small cuff or ruffle to the sleeve edge.


I've been teaching my daughter to sew, but I never left her cut out a dress because of the chaos of my pattern. But she was able to completely cut this dress out on her own. The pattern paper is sturdy and not like the thin tissue in many patterns and should stand up to lots of use. 

Patterns are available from size 1 to size 8. I used the size eight pattern. I was trying to make the dresses a bit too large for my seven-year-old. But they are quite a bit too big for her - she is a little bit small for her age. I don't mind, she'll wear them some day and I have more little girls coming along behind her. From what I can tell, the measurements are very accurate so take that into considerations when deciding which size pattern to purchase.


You can purchase Sew Basic patterns at Etsy or contact Michelle at sewbasicdresses @gmail.com I'm hoping these pattern sell well and Michelle is inspired to continue on into junior sizes - which I think are even harder to find than girl's sizes.

Thanks Michelle for serving us moms with your well-designed patterns.

Disclaimer: I received a free pattern, but all the opinions in this review are my own.

Thursday, November 5, 2015

Question: Teaching Your Daughter To Sew

My eleven-year-old daughter has been wanting to learn to machine sew.

I've been dragging my feet. I can still remember the trials I put my mom through when she taught me to sew. One skirt in particular had nearly every seam torn out as I sewed the pieces inside out and upside down. I just didn't know if I could be a patient teacher and I didn't want my daughter to have bad memories about sewing because of a frustrated mom.

But I think (or hope) my mom would say that teaching me to sew was worth it. At least it did not discourage her from teaching my younger sisters to sew. And I'm grateful to have the skills now. If my daughter had an interest, maybe I should at least try.

It doesn't seem long ago that I first taught her hand sewing with an embroidery patch. I thought my patience would be worn out on that first day. I had to sit beside her and help with each stitch otherwise she was putting her needle into the wrong side of the fabric and stitching her skirt to her patch. I didn't know that it was possible to get so many knots in one piece of thread.

But since then she has mastered many different stitches  and demonstrated that she has the patience to complete numerous pieces. And she can knots out of thread without my help at all.

Two or three years ago she cut out squares from scrap fabric and sewed the rows together with the sewing machine to make a comforter for her bed. She struggled with making straight seams but I thought she did well for her age.

But I also thought she needed a year or two before we tackled another project. Or maybe it was mom who needed more time.

Now I figured it was time to move onto the next step in teaching her to sew. If I could just move past my reluctance. (Maybe fear?)


So last week we gave it a start. We cut out two dresses. I taught my daughter how to pin the pieces together and she helped to sew all the straight seems. She also learned how to press the seams open. I sewed all the curved seams but it was a great start. She is eager to sew again, and I think I'm eager to try again too.


And we were all pleased with the final result.

But now I'm asking for your help. Do any of you have hints on teaching a young seamstress to sew? What are good projects to attempt? Do you have any books/patterns that have worked well?

And any good ideas on how to keep mom's blood pressure from rising?

Saturday, March 7, 2015

Yo-yo projects


My ten-year-old enjoys hand sewing but I am running out of ideas for her. She has done quite a bit of embroidery - but you don't need an endless number of embroidered pillow cases.


Her aunt gave her this Clover yo-yo maker for Christmas. It makes yo-yo-making so simple and she has had so much fun turning fabric scraps into yo-yos.

But then what?


She sewed some of her creations into a rectangle and we are enjoying it in the middle of our dining room table. I suppose we could make a bedsize throw with them but I'm looking for some other idea that would use a lot of yo-yos of random colors.

Do you have any suggestions?

Monday, December 16, 2013

Nesting

I'd never pick winter as my favorite season. I love the outdoors, the garden, and the sunshine. But there is something special about being holed up in a warm house watching the snow fly outside.


We have had far more snow than usual for December in this area. It is not often that we have a white Christmas.

The last weeks we have been enjoying some extra family time.


Baking cookies.


A day trip to a battlefield to coordinate with our school study of the Civil War.


Lots of messy art projects.

In between, the nesting urge has hit me hard. My energy level is not high these days but every day I'm trying to accomplish one extra project - even if it is something very small. Maybe making an extra casserole or two for the freezer, or a special cleaning project. I know that our baby can arrive without my filing cabinet organized or the stove scrubbed. But some of these projects I've put off for months or even years and I might as well take advantage of the unusual burst of motivation to hit some forgotten corners!

I've also spent a lot of time with my sewing machine. Sewing is one occupation that doesn't take too much energy yet produces results! Besides sewing some Christmas gifts and several dresses for my daughters, I've enjoyed some baby crafting.

I enjoy making a baby quilt for each of my children. I usually make a gender neutral baby quilt. But for our last baby (nearly five years ago) I made two quilts, one for a boy and one for a girl. Since the boy quilt has been in storage since then, I only had to make a girl quilt. This was such a fun project!


And here is the boy quilt.


And no, we don't know the gender of our baby. I love to be surprised. If you give me a birthday gift and tell me to wait a week to open it, I'll relish the build-up of anticipation. So I always love to wait until the birth to find out our babies gender. In fact, I like the surprise so much that I always am disappointed when friends tell me if they are having a boy or girl. Even if they don't want surprised, I feel cheated to not have the surprise myself!

Feel free to think I'm weird.

But back to nesting projects...

This summer I found a whole bag full of baby yarn at a yard sale. I found a pattern for some adorable baby hats online. It has been at least ten years since I crocheted and it was a challenge to read a crochet pattern. I may not have done it correctly and these hats may not fit any baby, but they sure were fun!


When we were expecting our first baby, my sister-in-law gave us a tiny pair of baby shoes. I sat them on my bedside table and when I heaved myself out of bed on those multiple night trips to the bathroom, those little shoes were a reminder that it would all be worthwhile some day. So I sat these two tiny hats beside my bed to keep company with the name book.

Sitting on the couch in the evening with a ball of yarn was so relaxing, I might have to find another crochet project this winter.

Or maybe I'll just spend the rest of the winter cuddling a baby. Yes, I think that sounds better than crocheting!


Friday, November 15, 2013

How to Sew a Cape Dress - Sewing the Dress Together

I always consider cutting out the dress pieces as the worse part. After it is cut out, all the decision making of what size, style is done. To me, the sewing is the fun part as the dress emerges from a pile of fabric.


First I sew up the darts (if using) in the bodice and cape.


Then I sew the bodice front and back together at the shoulder seams and do the same with the cape front and back. I like to hem the sides of the cape at this point.


Next I sew the bodice and the cape together at the neckline. I don't use any facings, which makes assembling so much easier. But sewing the cape and bodice together does take some different thinking. Typically when sewing, the fabric pieces are put together with the right sides of the fabric together so that when the seam is turned, all the seams will be inside.


But when sewing a bodice and cape together, place the right side of the cape against the wrong side of the bodice. When the seam is turned, the raw edge will be between the bodice and cape and will be hidden in the neckline.


Next I trim and clip the seam allowance at the neckline to allow it to turn smoothly, and stitch the seam allowance down against the bodice. This makes a smooth neckline with no visible stitching on the cape.


 Using a basting stitch, I baste the cape to the bodice at the waistline and in the back where the zipper will be inserted.


Sometimes I have had trouble with my cape gaping. I have found that if I pull the corner of the cape just slightly into the waistline, it helps with the gaps.


Next I finish the sleeves, stitching up the arm seam and finishing the cuffs however I chose for this dress. You can wait until the sleeves are sewn into the dress to finish them but I find it much easier to work with the sleeve before it is attached to the dress. On this dress, I made a simple pleated cuff.

Next I stitch the side seams of the bodice and insert the sleeves. I like to stitch my sleeves with double seams (just stitching twice around the arm hole) since sleeves tend to be a stress point that I have to mend often if not reinforced.


It is beginning to look like a dress! Almost done!

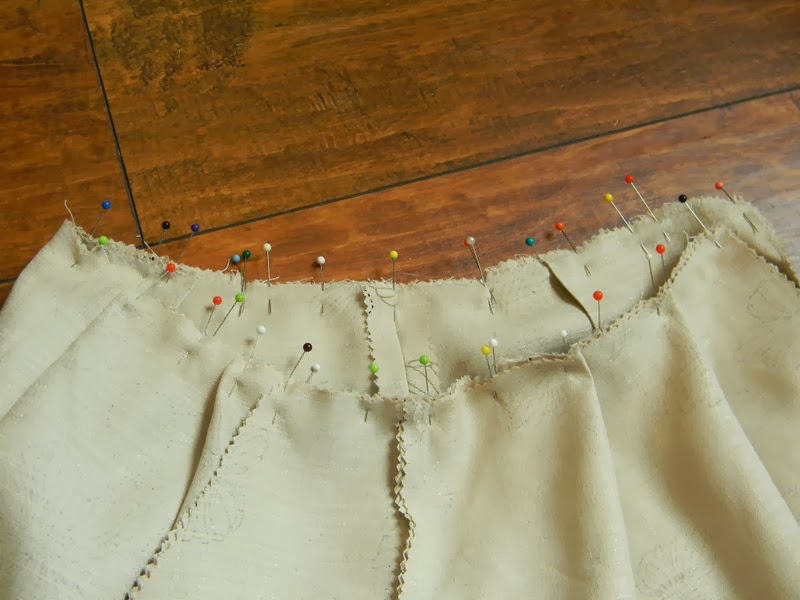
Next I sew the side seams of the skirt, inserting pockets if desired. Prepare the skirt to be attached to the bodice, with pleats, gathers, or however.


 For this skirt, since I wasn't using a skirt pattern, I pinned the skirt to the bodice at the side seam and center back and front. Then I measured even pleats in the front and back to pull in the fullness of the fabric.


After I was satisfied with the way the pleats looked, I stitched the skirt to the bodice. This is another spot I like to double stitch to avoid mending it later.


Next I insert the zipper. I like to use invisible zippers because then if my stitches are wocky, no one can see it.

Hem the skirt and it is all done!


And the final result.

Just in case you are curious...this photo was taken months ago. Right now I could never zip up this dress.


This is what I'm looking like today at 32 weeks!

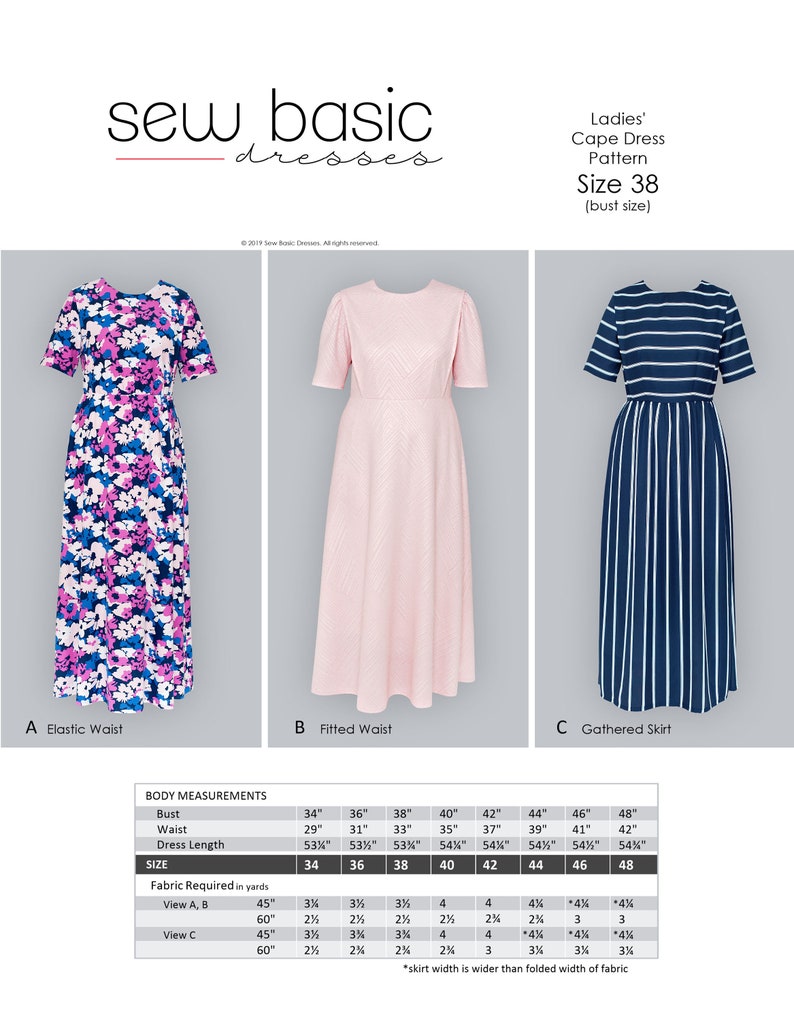
How To Sew a Cape Dress
Part One - Finding a Pattern
Part Two - Cutting Out the Dress

Tuesday, November 12, 2013

How to Sew a Cape Dress - Cutting out the Dress

I'm one of those talk-with-their-hands people. I'm not sure how to describe a project with only words and few photos. But I'll dive in and hope you ask questions for anything that is not clear.

Yesterday I shared that my pattern started with a purchased pattern that I tweaked and adjusted for me. I strongly encourage you to try out your pattern with scrap fabric before using your good fabric. You probably won't need to make a whole dress - just the bodice. The frustration of completing a dress then finding it does not fit is a frustration to be avoided at all costs!

To make a cape dress, you will need a pattern for the  front and back bodice, a front and back cape, a sleeve, front and back skirt, and pocket, if you wish.


Bodice and Cape

This is my bodice pattern. I like to use wrapping paper to make patterns. It is easy for me to see which patterns go together if I cut one pattern from Christmas paper and another from blue checks. As I adjust a pattern, build up the neckline, add to a side seam, or whatever - a pattern can have so many notes and additions that eventually I trace off a new pattern. I like to date the pattern so I know which version is the latest.


For my cape pattern, I use my bodice pattern. I fold in the sides making an almost straight line from the shoulder to the waist and use this for cutting out the cape.

To cut out the bodice, both the front bodice and the front cape pattern is placed on the center fold of the fabric so that when it is unfolded, it is one piece.

The back bodice and back cape pattern is not placed on the fold since it will have a zipper up the back.

Sleeve

You can use about any sleeve pattern you like as long as the sleeve hole in the bodice and the sleeve top are the same dimensions. A gathered or pleated sleeve is easier to adapt to various dresses. A fitted sleeve has to fit more perfectly.

Skirt

Various skirts patterns can also be used with your bodice. Again, a gathered or pleated skirt will be easier to adjust to various bodice patterns. A fitted skirt will have to be carefully measured to find if it fits your bodice. If you measure your bodice pattern at the waistline, subtract the seam allowances and darts, you will know how wide your fitted skirt pattern will need to be.


I often do not use a skirt pattern. For this dress, I cut out a rectangle of fabric, making sure the front skirt was on the fold of the fabric. Since I planned to make a pleated skirt, the top waistline of the skirt I cut one and a half times as wide as my bodice. In other words, if one of my bodice pieces (a quarter of the dress) was ten inches wide, I cut the top of the skirt fifteen inches wide. I cut the bottom a couple inches wider, maybe about 18 inches in this example, and then made the side seam diagonal from the top to the bottom for however long I wanted my skirt.

And I'm sure that description is as clear as mud. Sorry for my limitation with words. Maybe I need to shoot a video!

Next we will look at sewing the dress.


Monday, November 11, 2013

How to Sew a Cape Dress - Finding a Pattern

I love reader's questions. But one question that I get frequently, I never feel that I adequately answer. I finally decided I'd have to do a series of posts in attempt to answer it.
I'm often asked by readers where to find a pattern for my dresses. Or how to make a dress like mine.

There is just no simple answer. I wear what is known as a cape dress. It has an extra piece of fabric (or a cape) over the bodice of the dress. It isn't a pattern that you can find at your local sewing store.

The pattern I use is from several patterns that I have purchased, adapted to a cape dress, adjusted, tweaked, and finally, after over a decade, feel that it fits exactly how I want. I could copy off the pattern and share it with you - but it is doubtful that it would fit you.

Probably the best way to sew a cape dress is to find someone close to your size, and ask for their pattern. Several of you I've been able to direct to a local Mennonite church and a seamstress who could help you. But some of you live hundreds, even thousands of miles from any Mennonite community.

And maybe I should insert here that I am not saying that everyone should wear a cape dress. I believe that according to the Scripture, a woman should dress modestly. You can read more of what I've written on the topic of modesty here. But there are different styles of dress that fulfill the Biblical command of modesty. Many Mennonite churches, including my own has chosen to wear the cape dress and I have learned to appreciate the simplicity of this style of dress, but I'm not at all saying that this is the only way for a Christian woman to dress in a way that honors God. Neither is the cape dress something that you can only wear if you are Mennonite. I have friends who have chosen to wear a cape dress just because they like the style of dress.

So this series is not to condemn the way others dress. I hope this is helpful for those many readers who have written and asked for information on sewing a cape dress.

This series is also not a complete guide to sewing a dress. I'm not sure that I can describe something like sewing with a keyboard. I wish you could just come and spend a day by my sewing machine. I will assume that if you tackle this project you have basic sewing skills. You know how to sew a dart, pleat, and zipper. If you are not to that point in your sewing skills, spend some time with some simpler projects first.

To begin look for a dress pattern at my local fabric store that could be adapted into a cape dress. My goal is to find a dress pattern with sleeves that has a natural waistline with darts for fitting ease. If the neckline is too low, it can be adjusted. If you don't like the sleeve or skirt that the pattern shows, this too can be changed. But a basic bodice pattern is what you are looking for.

The patterns I used for my dress pattern are long out of print so I scanned the patterns of some popular pattern companies to see what is available now. I found two that I think would work.

 http://www.simplicity.com/p-8072-misses-dress.aspx
 http://www.simplicity.com/p-9785-burda-style-dress.aspx

From appearance, both of these two patterns would probably work to begin your pattern making. But I haven't used either of these patterns so don't know for sure and you may find something better.

Another resource I want to mention is Preparing a Cape Dress Pattern from CLP. There is some very good information here, much more than I will share, on adjusting a pattern and sewing a sloper. CLP also has a second booklet on Sewing a Cape Dress which also goes into much more detail than I will. These two booklets are a little dated but still contain a lot of good information.

EDIT on 2/10/2020:
Sew Basic Patterns now has a cape dress for women of all sizes. Excellent patterns that take the guessing out of cape dress making.

After you have a basic pattern, what next? The next post will be on cutting out a cape dress.

Wednesday, April 24, 2013

Winter Projects - Tied Quilt

This winter I wanted to teach my daughter how to use a sewing machine. I thought that a quilt would be the perfect project, especially since I have lots of scrap fabric for her to practice with.


We chose a rather large square (six inch) for a pattern to make it easy to cut and sew. We arranged the squares in the Around the World pattern with one square in the middle, then another fabric around that square, a different fabric for the next round, and so on. 


After she sewed all the squares into strips, I sewed the strips together. The final quilt was big enough for a double bed. We then layered the batting and backing with the front and stitched it together and tied knots. Officially, I guess this isn't a quilt because it isn't quilted but ties were much easier (and faster) than quilting.

Most of the fabrics are from my girl's dresses so it makes a nice memory quilt. My daughter chose the brightest colored scraps which makes the quilt rather busy but certainly makes a cheery quilt for her room!


My son wanted to join the fun too. He took the small scraps after we had cut the larger squares and cut little three inch squares and sewed them together randomly into a small baby quilt. He loved running the sewing machine - maybe a boy's love of motors? His seams were not even and many of the squares were not square but it should still be warm. He donated the quilt to a relief organization to give to a needy family overseas. 

Both children loved sewing by machine and are begging me to start another project. Maybe next year I'll pull out all my boxes of scrap fabric and let them make some more quilts to donate.


Saturday, October 15, 2011

Pillowcase Dresses


This week a group of friends got together for a pillowcase dress party. With a little ribbon and binding, a pillow case was turned into an adorable little dress.


I didn't hear the final count, since I left while the others were still going strong, but a dozen ladies created 30 + dresses.

These dresses will be shipped overseas. I can just imagine the delight of a little African girl to receive a new dress.


Want to join the fun? You can find many tutorials and directions for pillowcase dresses online. This would be a great project for mothers and daughters to do together.

LinkWithin

Related Posts with Thumbnails