
Another great soup recipe from my sister-in-law Sonja (not to be confused with Sonya!) This is a belly warmer soup perfect for days like this when we woke to 29 degrees with a heavy frost on the ground.
Taco Soup
1 lb ground beef
1 large onion, chopped
Brown together.
1 pack Hidden Valley Ranch mix
1 pack taco seasoning mix
1 can pinto beans- not drained
1 can chili hot beans
1 can corn
2 cans tomatoes
Add all together.
Simmer 1 hour
Saturday, October 30, 2010


Friday, October 29, 2010
Tattler Reusable Canning Lids
Purchasing something just to throw it away irks me. Our culture is filled with single use disposable items and I've been trying to eliminate as many as possible from our home.
I think that is one reason I love canning. All those shelves of wonderful jars that can be used year after year.
Except for the lids.
I will admit that I sometimes reuse jar lids (or flats) if they appear in perfect condition but reusing traditional Ball lids isn't reccomended.

That is why I was excited to find out about the Tattler reusable canning lids. These lids were designed to be reused. The lids are made of a hard plastic with a lifetime guaranteed. But, according to the company, in over 30 years, no customer has asked for a replacement.

The lid is fitted with a rubber ring. These, too are reusable though with time may need to be replaced. The lids and rings are fit onto an ordinary glass canning jar with an ordinary metal bands.

I tried using the Tattler lids when making applesauce this fall. It did take a little more time to adjust the two piece lids and rings. When tightening the metal bands, Tattler recommends turning the band back 1/4 inch to allow venting. After removal from the canner, immediately tighten the metal band firmly.

The lids to not have the familiar "ping" sound when cooling to indicate that they have sealed. After cooling completely, remove the metal bands and check by feel if the lids have sealed.
Out of twelve Tattler lids I used the first day, two did not seal. I was disappointed, though occasionally I have a regular Ball lid not seal. I guessed that I did not tighten securely. The next applesauce making day, I reused the two lids, tightened a bit more securely and this time they sealed perfectly.

In all, I was very impressed with the Tattler lids and look forward to gaining more experience with them in the future.
An added benefit (and maybe most important to some canners) is that the lids are BPA free. Apparently Ball lids contain BPA. I always figured that with home canning I was avoiding the BPA in metal cans. Since food didn't actually touch the lids, I didn't lose sleep over it. But for tomatoes and acid foods like pickles which are more prone to BPA problems, I'll probably lean toward using a BPA free product now that I know one is available. To me the reusable quality was more important than BPA free.
Maybe a more significant issue is cost. Tattler lids are not cheap. A pack of three dozen cost 20.95. That is about $7.00 a dozen. I figured that this summer I used 375 lids, over 30 dozen. Buying that many reusable lids is rather daunting and would add to the cost of home canning.
On the other hand, I'm young enough that I may can for 30+ years. By then the cost would be pennies. Then I could hand them down to my daughters, along with my canning jars and stainless steel pots.
I could probably use some lids more than once a season. For example, when I get out a jar of applesauce, I'm using the Tattler lids first. Hopefully by the time I can deer meat in December, I'll be able to reuse my dozen Tattler lids. Is it obvious I'm trying to talk myself into purchasing more?
Do any of you use Tattler lids?
You can find Tattler lids at their website reusablecanninglids.com or call 877-747-2793.
Tattler gave me one dozen issuable lids to review but all opinions in this review are my own.
Thanks to Homestead Revival who first introduced me to Tattler lids.
I think that is one reason I love canning. All those shelves of wonderful jars that can be used year after year.
Except for the lids.
I will admit that I sometimes reuse jar lids (or flats) if they appear in perfect condition but reusing traditional Ball lids isn't reccomended.

That is why I was excited to find out about the Tattler reusable canning lids. These lids were designed to be reused. The lids are made of a hard plastic with a lifetime guaranteed. But, according to the company, in over 30 years, no customer has asked for a replacement.

The lid is fitted with a rubber ring. These, too are reusable though with time may need to be replaced. The lids and rings are fit onto an ordinary glass canning jar with an ordinary metal bands.

I tried using the Tattler lids when making applesauce this fall. It did take a little more time to adjust the two piece lids and rings. When tightening the metal bands, Tattler recommends turning the band back 1/4 inch to allow venting. After removal from the canner, immediately tighten the metal band firmly.

The lids to not have the familiar "ping" sound when cooling to indicate that they have sealed. After cooling completely, remove the metal bands and check by feel if the lids have sealed.
Out of twelve Tattler lids I used the first day, two did not seal. I was disappointed, though occasionally I have a regular Ball lid not seal. I guessed that I did not tighten securely. The next applesauce making day, I reused the two lids, tightened a bit more securely and this time they sealed perfectly.

In all, I was very impressed with the Tattler lids and look forward to gaining more experience with them in the future.
An added benefit (and maybe most important to some canners) is that the lids are BPA free. Apparently Ball lids contain BPA. I always figured that with home canning I was avoiding the BPA in metal cans. Since food didn't actually touch the lids, I didn't lose sleep over it. But for tomatoes and acid foods like pickles which are more prone to BPA problems, I'll probably lean toward using a BPA free product now that I know one is available. To me the reusable quality was more important than BPA free.
Maybe a more significant issue is cost. Tattler lids are not cheap. A pack of three dozen cost 20.95. That is about $7.00 a dozen. I figured that this summer I used 375 lids, over 30 dozen. Buying that many reusable lids is rather daunting and would add to the cost of home canning.
On the other hand, I'm young enough that I may can for 30+ years. By then the cost would be pennies. Then I could hand them down to my daughters, along with my canning jars and stainless steel pots.
I could probably use some lids more than once a season. For example, when I get out a jar of applesauce, I'm using the Tattler lids first. Hopefully by the time I can deer meat in December, I'll be able to reuse my dozen Tattler lids. Is it obvious I'm trying to talk myself into purchasing more?
Do any of you use Tattler lids?
You can find Tattler lids at their website reusablecanninglids.com or call 877-747-2793.
Tattler gave me one dozen issuable lids to review but all opinions in this review are my own.
Thanks to Homestead Revival who first introduced me to Tattler lids.
Thursday, October 28, 2010
Fall Nature Walk

It has been a long time since we were on a nature walk, or did any kind of nature study. Of course, this summer had many opportunities for observing nature in daily life in the garden. Our bug identification book was well used.

But the lovely fall days this month have made me eager again to be out just spending time enjoying God's wonderful world.

These photos are from a walk on Sunday at our favorite park. The children loved filling their baskets with "treasures", looking for bird's nests and just burning energy.

I'm so glad God gave us Sundays to set aside our normal work for time to rest and worship. But days like this one make me wonder why I'm so busy. What am I doing that is so important that I can't take time on a regular basis just to enjoy the outdoors with the children?

Of course, we need to eat, and clean clothes and house are nice, but so often recently I find myself wishing the children would just "go and play" so that I could finish my task in peace. It isn't like I don't spend a lot of time with my children. Rarely are they out of my sight unless they are sleeping.
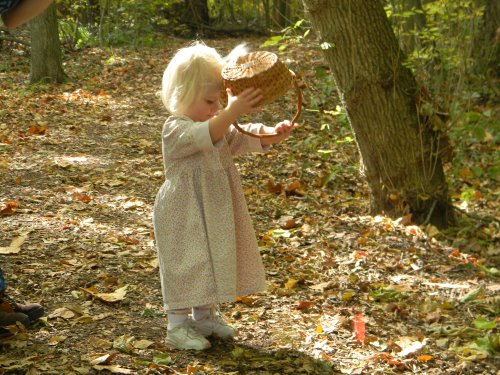
During the summer we practically lived outside, but now that shoes and socks are needed, it takes a little more persuasion for the children to go outdoors. But if I set aside whatever busyness I'm into, and go out with the children, they love it.

In the summer there is many outdoor tasks to keep me busy while the children play in the sandbox, ride bike or run in the pasture. But now, most of the work outdoors has ended and I find myself just sitting on the swing watching the children play - and feeling that I'm wasting time.

Why is it that I can't enjoy being still? Why do I see my success hinged on what I accomplish?

I don't have answers. Just what I'm thinking today.
Wednesday, October 27, 2010
White Chicken Chili
My sister-in-law, Sonya served this to us several years ago. It was so good that I've never forgotten about it.
White Chicken Chili
6 cups chicken stock
1 pound great northern beans (soaked in water overnight)
2 medium Spanish onions, chopped
6 cups diced cooked chicken
2 jalapeno peppers, seeded and diced
2 diced chili peppers
1 1/2 teaspoon oregano
2 teaspoons cumin
1/4 teaspoon cayenne pepper
2 cloves garlic, minced
1 cup salsa
1 tablespoon vegetable oil
Salt to taste
Sour cream (optional garnish)
Monterey Jack cheese (optional garnish)
White Chicken Chili
6 cups chicken stock
1 pound great northern beans (soaked in water overnight)
2 medium Spanish onions, chopped
6 cups diced cooked chicken
2 jalapeno peppers, seeded and diced
2 diced chili peppers
1 1/2 teaspoon oregano
2 teaspoons cumin
1/4 teaspoon cayenne pepper
2 cloves garlic, minced
1 cup salsa
1 tablespoon vegetable oil
Salt to taste
Sour cream (optional garnish)
Monterey Jack cheese (optional garnish)
Simmer beans, half the onions, and half the garlic for 2 hours in the chicken stock or until the beans soften, stirring frequently. Add chicken and salsa.
Saute pepper, spices, and the remaining onions and garlic in the oil and add to the chili. Simmer for one more hour.
Garnish with sour cream or Monterey Jack cheese.
Saute pepper, spices, and the remaining onions and garlic in the oil and add to the chili. Simmer for one more hour.
Garnish with sour cream or Monterey Jack cheese.
Tuesday, October 26, 2010
Stuffed Pepper Soup
Several weeks ago, Ed's family were all together and shared a wonderful soup and bread lunch. I married into a family of great cooks and I'll be sharing a couple of my sister-in-laws soup recipes. This one is from Ed's sister Jean.
This recipe was in the paper from a local chef at a sandwich shop as one of his most popular soups. He said he makes his own sauce "but it takes to long to write down....Ragu works fine." So I usually use my own sauce, (which doesn't follow any recipe to the letter.)
Stuffed Green Pepper Soup
2 lbs. lean hamburger
2 large sweet onions, coarsely chopped
2 large garlic cloves, minced
2 c. uncooked brown rice
2-4 large green peppers cut in 1-inch pieces
2 quarts spagetti sauce (or Ragu Homestyle)
salt and pepper to taste
salt and pepper to taste
Brown hamburger in large soup pot, drain fat. Add remaining ingredients and simmer about 2 hours on stove or longer if using crockpot. I like the peppers to stay green, so I don't add them till the rice is tender. Makes 15 servings (approx.)
Monday, October 25, 2010
Planting Garlic

Have you planted garlic?
Columbus Day is the traditional day to plant garlic here in the northeast but any time from September to November are great times for planting garlic.
You can wait until spring to plant garlic, but since it will have a shorter time to grow, the bulbs will be smaller.
I know a few of you are rolling your eyes at even the thought of planting garlic. Isn't garlic cheap to buy? Maybe. But garlic has to be one of the easiest thing to grow. Push it into the ground in the fall and basically forget about it until next July when you pull out a plump garlic bulb. If you mulch, you won't even have to weed.
I have found that the local garden centers only sell garlic bulbs to plant in the spring. Guess they think that no one is thinking about planting garlic in the fall.

I've had success at planting grocery store garlic but you run two risks. First, it may have been treated with some sort of anti-sprouting chemical. (A reason to grow your own.) Second, it may be a variety of garlic that grows well in China, but not in your area.
If you can find some untreated bulbs at a farmer's market that were grown somewhere close to you, you'll have some great growing stock.
Otherwise, plan to order from a reputable company. (I know, I should have written about this weeks ago so you would have time to order.) I have found that the most popular varieties sell out early so it pays to order early and most companies will ship at the proper planting time.
The number of garlic varieties is limitless. I ordered two varieties that were reputed to grow well in my area. I chose a hard neck and a soft neck variety. The "neck" refers to the inner stem. I like using hard neck garlic because the cloves are larger and easier to peel. But soft neck garlic is easier to braid and some say it stores better.

The great news- once you purchase some garlic sets, you'll never need to buy garlic again. After pulling your garlic in July, allow it to dry. I hung mine in the wood shed where it was nice and airy but out of the rain. In the fall, separate the bulbs into individual cloves. Keep the papery skin intact if possible. Plant each clove several inches deep in good fertile soil and it will grow into a new bulb by next summer.
See how simple it is!
 Every year I increase the amount of garlic I plant and save the rest for eating. But so far, I haven't had enough to last the year. But if I keep increasing the amount I plant, eventually I should have plenty for planting and eating.
Give garlic a try and enjoy the flavor of home grown garlic.
You may also enjoy reading Time to Plant Garlic at Simple Green and Frugal.
Linked to Tuesday Garden Party
Guest Post - Tortilla Soup
Elisa from Bird in the Hand shared this yummy sounding soup! Several of you shared your favorite soup recipes. Look for more of them this week.
This recipe is from my mother-in-law: we recently had a soup recipe exchange at a monthly Titus II Bible study she leads for women at our church. She shared this one ... and I promptly put in on my weekly meal list for the following week! It is really delicious and easy to adapt.

Tortilla Soup
8-10 Corn Tortillas - roughly chopped
4 T. Oil
1 Onion - chopped
6 cloves Garlic - minced
2 14.5 oz cans of diced tomatoes
8 c. Chicken Stock
2 tsp. Cumin
1 T. Chili Powder
3-4 Boneless Chicken Breast Halves
1 can black beans - rinsed and drained
1 4 oz. can diced Green Chilies
Heat oil in large soup pot. Add onion and cook 2 minutes. Add garlic and cook another minute. Add torn tortillas. Cook 2-3 minutes. Add cans of tomatoes, chicken stock, cumin, chili powder and bring to a boil. Add the chicken and simmer 15-20 min until chicken is cooked through. Remove chicken, cook, and shred or cut up into small pieces. Return chicken to pot and add beans and green chilies. Return soup to a simmer. Ready to serve! Top with a dollop of sour cream, shredded cheese, hot sauce, crumbled chips, chopped avocado, etc.!
My mother-in-law also always fries strips of corn tortillas and serves those on top. Cooking the chopped tortillas in the soup thickens the soup to a wonderful consistency because they break down quite a bit.
My Variations: I cooked the chicken in a crock pot during the day (w/ garlic salt, chili powder, and onion powder) to slash on the actual cooking time of the soup. Just shredded it and added it after the liquid had been brought to a boil. I also added some corn into the mix.
Thanks, Elisa. for sharing!
This recipe is from my mother-in-law: we recently had a soup recipe exchange at a monthly Titus II Bible study she leads for women at our church. She shared this one ... and I promptly put in on my weekly meal list for the following week! It is really delicious and easy to adapt.

Tortilla Soup
8-10 Corn Tortillas - roughly chopped
4 T. Oil
1 Onion - chopped
6 cloves Garlic - minced
2 14.5 oz cans of diced tomatoes
8 c. Chicken Stock
2 tsp. Cumin
1 T. Chili Powder
3-4 Boneless Chicken Breast Halves
1 can black beans - rinsed and drained
1 4 oz. can diced Green Chilies
Heat oil in large soup pot. Add onion and cook 2 minutes. Add garlic and cook another minute. Add torn tortillas. Cook 2-3 minutes. Add cans of tomatoes, chicken stock, cumin, chili powder and bring to a boil. Add the chicken and simmer 15-20 min until chicken is cooked through. Remove chicken, cook, and shred or cut up into small pieces. Return chicken to pot and add beans and green chilies. Return soup to a simmer. Ready to serve! Top with a dollop of sour cream, shredded cheese, hot sauce, crumbled chips, chopped avocado, etc.!
My mother-in-law also always fries strips of corn tortillas and serves those on top. Cooking the chopped tortillas in the soup thickens the soup to a wonderful consistency because they break down quite a bit.
My Variations: I cooked the chicken in a crock pot during the day (w/ garlic salt, chili powder, and onion powder) to slash on the actual cooking time of the soup. Just shredded it and added it after the liquid had been brought to a boil. I also added some corn into the mix.
Thanks, Elisa. for sharing!
Subscribe to:
Posts
(
Atom
)
LinkWithin


